Showing posts with label stickers. Show all posts

Tuesday, 23 July 2019

Loved Crazy | Allara Bamforth

Hello there!

I'm back on the blog today with another layout featuring the 'Art Foamie' Stamps as my background.

On my black cardstock I have used the 'Fill It In' Trio and stamped the crosses and tyre tracks in Artic white paint haphazardly over the right side. Once dry, I've sponged some Aquamarine Dream over the top through the Knucklehead stncil. Mixing some of the left over paint with water, I've splattered this around where I planned to put my photo.

Next I've stamped the noughts and crosses art foamie with Perfect Medium in random spots and over the this I've used gold Perfect Pearls for a reallly cool shimmer. Once dry I've taken the Sunshine Yellow paint and swirled it around where I planned to place the photo.


For matting my photo I've used various Everyday Etc Filler Cards, Everyday Etc cards and Flair Button from the Flawsome range. The crazy sticker was taken from the We Are Family range and the Sticky Qutoes from the 'Magical AF' Range.

I love how this page ended up coming together! As usual I don't really have a plan I start a back ground then go through my stash and phtoos and start pulling matching bits together. I love how you can do this with the entire Flutterby Range.

Thanks for taking a peek!

Till next post,


Monday, 1 July 2019

Well S*&# Aye II Chrissi Mannix

Hello Lovelies,
So its been awhile since I've been in my art room, and my mojo is lacking a little. But this weekend was full of some big moments that I just HAD to journal about. I have, what I call a creative journal. Its a mix between a journal, an Art journal and a brain dump I say. it's my outlet.
and this weekend, my hot water tank, literally exploded on Friday night. Not so fun.
So this was def something to journal about, and if there was ever a time for the 
Sentence Enhancer Collection, well this was it.
I started with the Sentence enhancer stencil, and some modeling paste. I wanted a few choice words to stand out from my background. Then I used some coloured ink and water to add colour to my page. This makes the texture paste pop aswell.
I printed my pictures in a small size so I could add 2 to my page. I stapled them together and glued them to my page. I used some stickers from past sticker sheets below my photos to express a few phrases that were used during this moment lol.
I knew I wanted to highlight my "title', and the Sentence Enhancer wood veneer set had the perfect words for this page. The wood veneer is always alot thinner then usual, which means it didn't bulk up my page, and my journal. A reason I Adore the Flutterby Wood Veneer. I used some of my fave alpha stamps and archival ink to complete my heading.
So that's it from me for today, I hope you enjoyed the little look into my Creative Journal/brain dump as I lovingly refer to it, and I will be back soon with a new scrappy project.
Happy Scrapping 
Chrissi xxx

Sunday, 19 May 2019

Love This | Tamara Buckler

Hey Hey Flutterby Peeps, 

I'm coming to you today from retreat with Boss Lady Neets - and it is bliss!!

I have a super messy mixed media layout to share with you today featuring the new Flutterby Art Foamies - I am in love!! 

I started this page by gessoing my background and applying dots of Flutter Colour Paint in Grape Soda and Tropicana Teal and spreading it in a cross shape across the page using a old card. I added some splatters in both colours before drying.


I used the Little Bit Love Stencil and some white gesso to add some texture and draw the white of the background into the mixed media. I then loaded up the Edgie Art Foamie stamps with some Black Mayhem Flutter Colour Paint, stamping randomly within the same cross area. I then came in with a black Posca pen and added some rough doodles and scratches. 


I matted the whole page on a 12x12 piece from the Magical AF collection, and did a messy border around my cardstock with the Posca pen. I then started to matt my photo using Everyday Etc Cards12x12 paper, and some Fussy Cuts


I embellished the page using a random combination of stickers, wood veneer, flair buttons, die cuts, and enamel dots


Thanks so much for stopping by today, I'm so excited to keep playing with these Art Foamies and seeing what I can come up with. Make sure you get over to the shop and pick some up before they are all gone. 

Big Loves, 
Tam xo


Friday, 1 February 2019

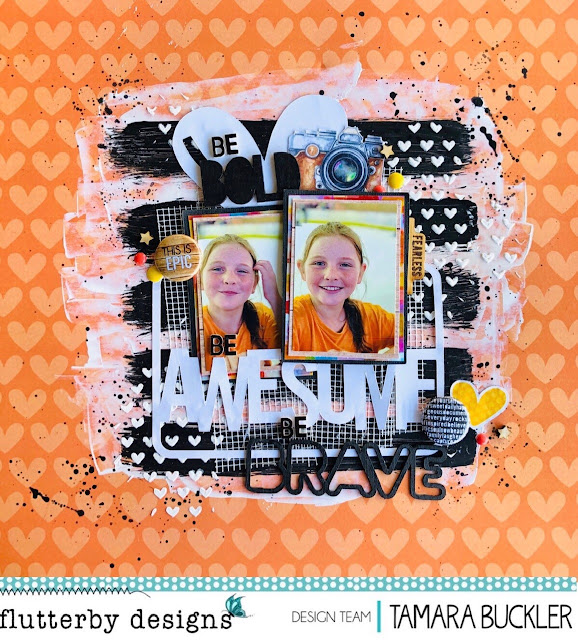
Be Bold, Be Awesome, Be Brave | Tamara Buckler

Helllooo Peeps,

I'm up again to share with you another fun layout featuring the 'We Are' collection, as well as some other awesome bits and pieces. This one is nice and bright, with a heap of impact, seems to be how I roll at the moment!


I have used the 'I'll keep you' paper from the 12x12 paper pack as my background, and have added some white gesso to the centre of the page to soften what is a very bright and busy pattern. This allowed me somewhere to work with my mixed media, and other elements.


I created some very bold paint stripes using Black Mayhem Flutter Colour Paint and a dry brush. I then added some texture by using the Little Big Love stencil and some texture paste, and by adding some plasterers tape.


I layered up my photos using some Everyday Etc Cards from the 'We Are' Collection. I tucked both my photos into a Photo Cut Out, this helped to ground my photos and I was able to work this into my title.

I used some wood veneer words from my stash, and painted them with the black Flutter Colour Paint, to complete my title.


I finished off the page by adding in some Flutterby Flair Buttons, various stickers, and enamel dots.

Thanks for stopping by again today, and I hope you feel inspired to create something using the amazing 'We Are' collection!

Big Loves,
Tam xo


Friday, 2 November 2018

Right Here | Sue Plumb


Hi everyone! 
Sue Plumb here to share my latest design team project with you. Today I have changed things up and am keeping it simple with "clean" layout for a change. I have been incredibly busy lately, (something I am sure many of you can relate to), so I decided to create a quick page using my take on a grid style design and some older items from my Flutterby stash.


I wanted to document this super fun snap of my friend Krisy Podolak and I at the Qld border as we returned home from the Flutterby retreat last year.

I started with a sheet of wood grain patterned paper from Cocoa Vanilla Studio for my layout base, as I knew the warm wood tone would coordinate well with my photo and the cards I had selected from the 'Any Direction' Everyday Etc card pack. 


I shuffled the card pieces and the photo around on my page until I was happy with their placement then stuck them down immediately, knowing I would work all the embellishments into the remaining spaces.

I started with a couple of stickers - the super cute sunglasses and road trip sticker were from the Good Vibes Only Sticky Quote sheet; whilst the mix tape sticker was from the Xtreme Teen Sticky Quote sheet. 


I added the click click click and always find adventure stickers from the Blackboard Sticky Quotes sheet; and used Blackboard Sticky Alphas to add the border mole patrol words. 

I dug through my wood veneer stash, finding the word adventure, a camera and some wood veneer stars. 


I cut the little aqua enjoy the journey phrase from one of the Snippet Strip sheets from the Cool Snippet Strips pack.

At the top of my page I added the enjoy the journey flair button from set #394.


Once I had everything down on my page, I splattered a little white mist on my page then stamped the date and I was done. (I told you it was a simple one today!)

Thanks so much for stopping by so I could share this with you. I hope I have inspired you to dig through your Flutterby stash and create something using up some older bits and pieces too. 
Until next time, happy scrapping! 


Sunday, 13 May 2018

Project Life with Adele *NEW HAPPILY EVER AFTER COLLECTION!*

Hello lovelies!!

I am so excited to begin working with the fab new collection "Happily Ever After" and dived in immediately to work on some of my Project Life pages.

I used lots of the stickers this week to act as journaling on my pocket cards. The tiny word stickers come in handy when you just want to add a tiny little detail to a photo. 

I used some of the enamel dots and an Everyday Etc card to create a simple filler card with a tiny bit of journaling. There's so many colour choices in the Everyday Etc cards and filler cards so it's easy to find a card that will coordinate with your photos for each week. I decided to keep this particular one quite neutral and added brighter cards to the top and bottom rows instead. 

I really enjoy adding the page tabs behind my photos, especially with very busy photos or photos that don't have a lot of blank space (like the one below of Archie's GIANT head hehe!). 

I hope you enjoy this little Project Life page, I will be back in a couple of weeks with my first layout and process video using the "Happily Ever After" collection. Have you started using the collection yet??

Adele :)


Wednesday, 25 April 2018

'Happy Summer Memories" by Rachel Dutko

Hi everyone

Today I have a bright and fun page to share 
using the "Good Vibes Only" collection.


I used a piece of 12x12 'Sea + Me' paper for my base. 
I created some layers under my photos with some Everyday Etc filler cards.


 I matted the 'Happy' and 'Memories' pieces from the Die Cut Bits & Bobs pack, 
as well as fussy cut the word 'Summer' from an Everyday Etc card.


I added some Wood Veneer pieces and some Stickers
I also added a flair and fussy cut an icypole from an everyday etc card.


I finished off with some enamel dots.

Check out the full kit of this fun collection here.


Thanks for looking 
Rachel x x


Wednesday, 11 April 2018

'Hi Sunshine' by Rachel Dutko


Hello everyone

Today I am sharing another page using the awesome Good Vibes Only collection.


I started my background with some Flutter Colour paint, firstly with 'Tropicana Teal', 
then with 'Orange Goldfish'.

I then traced through a 'Mmm Pie' stencil with a Sharpie pen.  

I layered some Good Vibes Only Everyday Etc Filler cards under my photo. 
I also added the sand filler card from the Fair Dinkum Chrissy Everyday Etc filler cards 
(can you spot it under the layers??!!)


I added a 'barefoot' sticker, and used the 'sunshine' wood veneer piece as my title. 
I also added a flair button and page tab


How cute is the sandcastle and crab from the Die Cut Bits And Bobs pack??!! 
I also added a wood veneer spade and sunscreen bottle.


I added some Kraft Sticky Quotes and some Orange Sticky Snippets around the page.


Thanks for looking

Rachel x x


Sunday, 7 January 2018

Dec 25 Christmas Cheer | Belinda Spencer

Hello Flutterby Designs fans!!

Belinda here today to share my very first projects for the new year featuring the awesome Fair Dinkum Chrissy collection. I am so very happy to be back for another year of scrappy fun at Flutterby Designs and I am very grateful to Anita for having me back. I am so looking forward to creating alongside the new team of awesomeness.

Anyway, onto the shares!

My little family and I quite often head to the beach on Christmas Day so this is just the perfect range to scrap our family beach Christmas tradition.

'Dec 25' Layout


For this layout I was really drawn to all of the gorgeous silver elements in the Die Cut Bits & Bobs as well as the filler photo cards. I especially couldn't wait to use the stunning silver glitter acrylic 'Dec 25'. I swiped some silver acrylic ink across my white card stock base and let that dry before adding a little stamping. I flicked some of the silver ink as well as black and white Posca Pen paint over the background too.


I kept my colour scheme simple by using neutral black, white and silver. This colour scheme really made my darling daughter's red Christmas dress pop in the photo.


I created lots of layers as always with messy embroidery thread, page tabs, wood veneer and die cut elements.


I coloured the wood veneer with the black and white Posca Pens.


Here's what I used:
- Acrylic Title


To keep things fair, I have also scrapped a photo of my sweet son from the same Christmas Day at the beach.


'Christmas Cheer' Layout


For this layout I have reverted to type and used my very favourite Tropicana Teal Flutter Colour Paint diluted to a watercolour consistency on my background. I swiped some texture paste through the Bubble O' Fun Mini Stencil to add some dimension and interest.


I cropped some of the Filler Photo Cards to create the layers under my photo but that beach scene one is my absolute favourite so I just had to use the whole thing.


I finished off with some twine, wood veneer bits, flair button, page tabs and some cute stars that I fussy cut.


Here's what I used:


Well I hope you have been inspired by my first projects for 2018. Have you had a chance to scrap some Christmas photos yet with this fabo range? Please remember to add your awesome layouts to the Flutterby Inspiration HQ group. I really love to see what you have made.

Thanks for stopping by!

Cheers
Belinda