Wednesday 27 February 2019

Currently || Bernii Miller

Helllooooo

I have a Travelers Notebook spread using the " We Are" collection.


I love creating in my Travelers Notebook, and the 3x4 and 6x4 filler cards that Anita creates is the perfect for this scrapping size. And how awesome is this Frame card that you an cut apart?? It fit my 3x4 photo perfectly. 


I decided to use this cute little cut file from Cut to You which seriously teams perfectly with the 
"We Are" filler cards, and the page tabs are awesome little additions. 


That's it for me today. 

Thanks so much for stopping by. 

Bernii Miller

Monday 25 February 2019

She Leaves a Little Sparkle- Chrissi Mannix

Hi Lovelies!!
I have a cute girlie layout featuring the new Magical AF collection today.

This collection is just perfect for those little girls in your life. This is my gorgeous niece, just so perfect for these awesome quotes and embellishments.

When I first saw this collection, my first thought was, I wanted to do something pink and sparkly lol.
But I wanted some interest in the background. So I grabbed an older Flutterby Stencil, ans using Gel Medium, used it to create a resist in my backround. When dry, the Gel Medium, resists the colour you apply over the top. In this case, I used a shimmer colour spray in hot pink with the packing technique. Once its dry, just buff away the colour on the gel medium, and boom, instant resist. 
I've said it before, I adore the Every Day Etc cards, and how they can be cut up and used as titles and embellishments. This one was just too perfect. Adding some of the gorgeous little sparkly hearts to embellish and it all came together nicely. I felt that it looked a little bare in a few places, so I decided to cut out some of the gorgeous gems from the Magical AF Paper collection and use them to embellish my layout aswell.
So that's it from me and my first play with the new Magical AF Collection. Head to the store if you want to get your hands on this collection, but be quick, I cant imagine it will last long.


Friday 22 February 2019

A little bit of Sparkle || By Elisa Ablett


Hi Flutterby Fans,

Elisa here from the design team with my latest layout featuring the new collection 
from Flutterby  'Magical AF', if you haven't got your hands on this as yet, be quick! 
I don't think it will last long.

To start my layout, I traced a series of circles onto my page and painted them with paints matching the elements in the collection. I added highlights in black and gold foil to add a little shadow and sparkle to my design. 

Then cracking into my stash of older Flutterby Stencils, I used the star stencil and a distress tool with black ink to add star highlights across my page.

Let's take a closer look at the cool AF elements from the new collection!


 Just look at that cute unicorn! I fussy cut him out from the Everyday Etc Cards from the kit and paired with a great Die Cut makes for a great title.


Balance the other side of your layout with your secondary title, 
a cute little unicorn flair button and paperclip from the new kit. Make sure you add some cute little star stickers from the magical-af-sticky-quotes.


Lastly, add some colour and sparkle under your photos by using some of the gorgeous little backgrounds from the Filler Cards and perhaps a page tab or two.


That's it from me today, I hope you have been inspired to try the new collection and perhaps a bit of mixed media to match 😀😀😀😀💗

Hugs xx

Elisa Ablett


Wednesday 20 February 2019

Magical AF | Allara Bamforth

Happy Hump Day!

Today I have a layout using the new collection 'Magical AF'. What a fun collection this is and I found the perfect snapchat selfie to use with this layout.

I started off with the fabulous 12 x 12 paper 'The Sky's the Limit' and because I was using mostly blue and pink elements on this page, I smooshed a little Picked Raspberry Oxide ink on my mat and splattered this beneath where my photo would go. Next I used Flutter Colur Paint in Artic White to splatter over the pink as well. I then added some gel medium through the Star Mini Stencil beneath my photo and while it was still wet, I sprinkled over some Bridal Tinsel embossing powder and heat set with my heat gun. This gave a great sparkly effect that added some interest to the back ground.

My photo is matted with various background designs from the Every Day Etc Filler Cards Magical AF collection and I've also added some cut outs from the Everyday Etc cards. From the Filler Cards I've die cut some wings to suit the page and added a Page Tab to the top.

To finish the page off I've used some the gorgeous new embellishments including a Flair Button from the Magical AF Set 2, the gorgeous unicorn paper clip from the Full Collection Kit, the sparkly Puffy Heart Stickers and jewels and the epic Magical Mettalic Arylic Title.


Thanks for taking a peek! I've linked all the new products back to the shop - make sure you grab some before they sell out.

Till next post,


Monday 18 February 2019

Make Your Life Magical | Rachel Dutko


Hi everyone!
Rachel back with you today with my first page 
using the brand new 'Magical AF' collection.


 As soon as I opened the new kit, I was immediately drawn to the 
Secret Garden 12x12 paper
and knew I wanted to fussy cut all the flowers. 
It took a while, but I'm so happy with the result!

I chose to use black cardstock as my base, so the bright colours of the flowers 
could really jump off the page.

To create my background I added some Flutter Colour Paint in 
Tropicana Teal with a dry brush, 
then added some splatters straight from the bottle. 
I then added some Colour Blast 'Royalty' Colour Paste through a Halftone stencil.


I added some stickers from the Sticky Quotes sheet, as well as a unicorn 

I didn't need to add too many embellishments, as the bright fussy-cut flowers 
make a grand statement all on their own.


I fussy cut the word 'magical' from an Everyday Etc card, then matted it 
onto white cardstock, and again fussy cut and inked the edges.
I also added an Everyday Etc card under my photo.

I raised my title word up on some cardboard for more dimension.


 I added layers of cardboard under my flowers too, 
to add more dimension to the flower clusters.


Thanks for looking
Rachel x x


Saturday 16 February 2019

You are proof | Tamara Buckler

Hello Flutterby Friends,

I'm back again today to share my first layout using the 
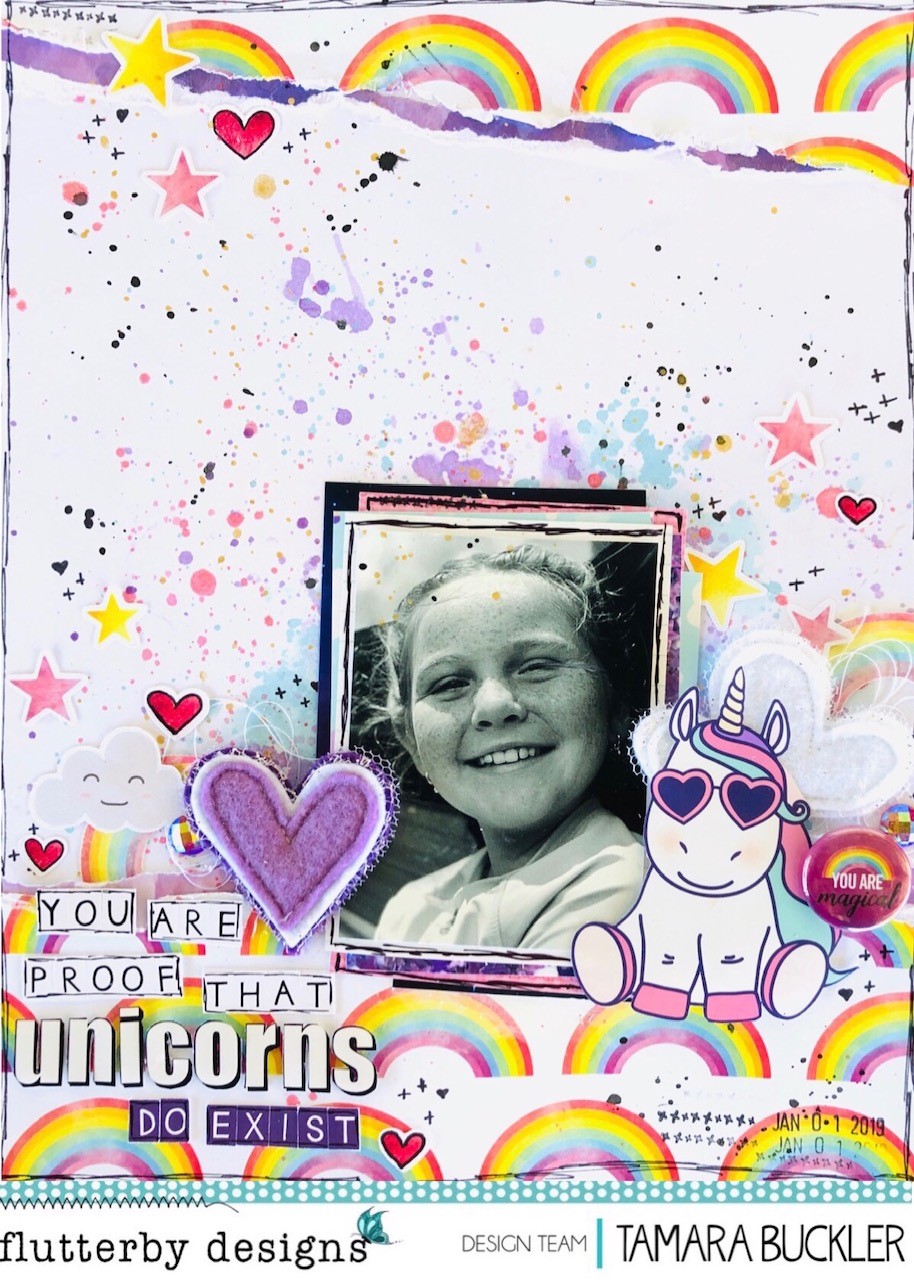
Magical AF collection, which I am totally in love with!! Honestly, I think this collection was made for me. My 9 YO daughter is obsessed with Unicorns, so I have lots to scrap about!!


I started this page with the 'Somewhere over the Rainbow' 12x12 paper in mind, but because I wanted to add some mixed media, I decided to just add it at the bottom and top of the page. I tore strips from the paper, decided on the position of my photo and then added my mixed media to a piece of white cardstock. I used watered down Flutter Colour Paint in Grape Soda and Raspberry Punch, as well as a few other inks and mists. 


I layered up some Everyday Etc Filler Cards behind my photo, focussing on pulling the colours from the rainbows. I then decided to fussy cut this gorgeous unicorn from one of the Everyday Etc Cards - this then guided how I would build my clusters around my photo - due to the scale of the image compared to the rest of the page.


I tucked a Charms Creation cloud behind the unicorn, and then fussy cut a rainbow from the patterned paper to tuck behind - I dulled this down a bit with some gesso so it became a background piece. I then tucked some other elements around this, including a flair button, some thread and a gem.


I added a Charm's Creations heart to the other side of my photo to balance out the page. and tucked another rainbow and gem behind it. I also added a cute little cloud from the Die-cut Bits and Bobs pack.


To build my title, I fussy cut the word 'Unicorns' from one of the Everyday Etc Cards, and mounted it onto some foam tape. I then used some Sticky Alphas that I had in my stash to make the other words, sticking them to some cardstock and then cutting them out.


I scattered some hearts and stars from both the Bits and Bobs pack and the Sticker Sheet around the page, and I love how this carries the whimsy and colour from the bottom to the top of the page, and ties the two pieces of patterned paper together.


I actually called the page done at this point, and went off to work the next day with a bit of a feeling that something wasn't quite right - it dawned on me at lunch time that the photo was too dark and felt like it wasn't connected to the page (scrapbookers, right?!?). I came home and added a darker piece of paper from the Everyday Etc Cards behind my photo, and then added some black splatters, and black doodling, including around my title and photo mats. I really feel like that this ties everything together much better, and anchors the photo to the page. Now it really was done!

Thanks for stopping by today, and make sure you jump over and get your hands on this awesome new collection! I can't wait to share more of my creations with you over the next few weeks.

Big Loves,
Tam xo


Wednesday 13 February 2019

"Loved" mini file folder by Bernii Miller

Hello everyone. 

Bernii here with you today to share with you a mini album of sorts that I created with the "We Are" collection that you can check out HERE

This year I have a scrappy goal where I am hoping to scrapbook more photos into these file folders. So these mini collections are perfect to embellish and create a seamless look through the whole album. 

So let me show you what I created. 


The cut out " Bits and Bobs" had perfect elements to decorate the front of the album. I used both tape adhesive and tacky glue to adhere them down.  


 I used one of these fun #happy wood veneer pieces that I have had in my stash for quite some time.  Although this particular piece isn't available anymore there are tons of awesome pieces HERE in the shop.


To add in extra pages to the album I adhered two " We Are" filler cards together and then added it into the spine using washi tape. To add a little interest I cut in a wedge to help turn the page. 


I did the same again for the orange flip flap on the right hand side of the album, using the filler cards to make extra space in the album for photos. 


Thanks so much for stopping by. 

Till next time.

Much love 

Bernii xx

Sunday 10 February 2019

You Make my Heart Sing- Chrissi M

Hello Lovelies!!
Today I'm following suite and working with some older collections before I crack into the new 

This is a layout using a small photo, and some cards from the We Run the World Collection. I love using the Everday Etc cards as layering pieces and cutting them up to use as embellishments- as I've done for my title. I knew this collection would be perfect for this layout. As my photo was so light and washed out, I wanted to bring in some of those rich green tones to balance it out.
Isn't my teeny tiny brayer the cutest? It was perfect to build up my background . I used a mixture of paint and scribble sticks in Night, Ocean and Turquoise. Using my stamp block as a palette, I applied my colour in layers to build up an area behind my photo.
Coming in with some grey scribble stick, I applied it to my stamp- one of my favorite stamping techniques, and added more texture to my background.
The photo is a 2x3 print from my HP Sprocket. My sister had sent this pic of her and my son at the beach. It was so cute i decided to scrap it that very day. As I said, it was very washed out, i loved the effect, and thought it would look great with the rich colours in the We run the World Every day Etc cards. I layered up the cards to make a mat behind my photo and for my title.
To add some details and embellishments to my layout, I used some Page Tabs and for my title I used some Snippet Strips. They are such great value, and have some really cool phrases and sayings. I love this layout, and liked using the different sized photo. Thanks for stoping by, and ill be back later in the month with a new project.
Chrissi xxx


Friday 8 February 2019

#GIRLBOSS || By Elisa Ablett


Hi everyone, 

Elisa here from the design team with my latest layout using a few bits and pieces from past collections and the bright colours of the gorgeous Flutter Paint.

So who is ready to STASH BUST before the next new collection?

To start my layout, I wanted to create a statement piece in the middle with the Flutter Paint and a Brayer. I also used a baby wipe to remove some of the paint through the 'Bright Like a Diamond' stencil. Add some 'crappy distressed sewing' that I seem to be really good at and some gorgeous Washi tape and bright Enamel dots.

The filler cards worked perfectly going through my die cutter and I love the resulting flowers and leaves to go with my layout. This is a great way to use some of your filler cards that you have left over!!

I utilised an older kit called "We run the world' which I really loved and I am still using up all the last bits and pieces from.

Lets take a look at the close up pics!


I used a white modelling paste through the "Little Big Love' stencil under my photo cluster and also on the opposite side to create a subtle texture and layer to the layout.  Add your die cut flowers and leaves in layers around your filler cards and I also added a few Gold handmade embellies from Charms Creations as well. Love these beauties.


Some distressed sewing and black border using a fineline black pen, washi tape and enamel dots to point the way to the photo on the page.


Balance your page by adding an embellishment cluster on the opposite side of your page using the same techniques and products.


Flutterby Designs Products used in this layout: - 


Now that we have successfully used a whole heap of our Flutterby Designs stash who else is super excited to order and receive the new Magical AF collection that is now in store?


Thanks for stopping by the blog today, stay tuned for my next project on the 22nd Feb featuring some of the new collection!

Elisa x