Showing posts with label star stencil. Show all posts

Saturday, 5 October 2019

Unicorn cards | Rachel Dutko

Hi everyone! Rachel back with you on the blog today.

Recently I needed to make a card for my niece's 4th birthday, 
and I thought the "Magical AF" collection would be absolutely perfect.

I have made a set of 3 cards to share with you today, all featuring unicorns from the collection.


For my first card I have fussy cut a unicorn from an Everyday Etc card 
and adhered with foam tape. 
I have layered some Everyday Etc filler cards, and a frame.

I just love the cute unicorn on her own so I didn't embellish this card. 
(And she suits my niece to an absolute T.)


For my second card I have lightly sponged all 3 colours from the 


I have fussy cut the unicorn and the words from some Everyday Etc cards.
I have used the pink glitter Everyday Etc filler card, 
and added a hand drawn border.


For my third card I once again fussy cut the unicorn from an Everyday Etc card.


I added some Orange Goldfish Flutter Colour Paint through a star stencil
I sponged on some pink Flutter Colour paint to add a halo around the unicorn shape.

I also added an 'Always Be Kind' quote from the Die Cut Bits & Bobs pack.  


Thanks for looking
Rachel x x


Monday, 25 February 2019

She Leaves a Little Sparkle- Chrissi Mannix

Hi Lovelies!!
I have a cute girlie layout featuring the new Magical AF collection today.

This collection is just perfect for those little girls in your life. This is my gorgeous niece, just so perfect for these awesome quotes and embellishments.

When I first saw this collection, my first thought was, I wanted to do something pink and sparkly lol.
But I wanted some interest in the background. So I grabbed an older Flutterby Stencil, ans using Gel Medium, used it to create a resist in my backround. When dry, the Gel Medium, resists the colour you apply over the top. In this case, I used a shimmer colour spray in hot pink with the packing technique. Once its dry, just buff away the colour on the gel medium, and boom, instant resist. 
I've said it before, I adore the Every Day Etc cards, and how they can be cut up and used as titles and embellishments. This one was just too perfect. Adding some of the gorgeous little sparkly hearts to embellish and it all came together nicely. I felt that it looked a little bare in a few places, so I decided to cut out some of the gorgeous gems from the Magical AF Paper collection and use them to embellish my layout aswell.
So that's it from me and my first play with the new Magical AF Collection. Head to the store if you want to get your hands on this collection, but be quick, I cant imagine it will last long.


Friday, 22 February 2019

A little bit of Sparkle || By Elisa Ablett


Hi Flutterby Fans,

Elisa here from the design team with my latest layout featuring the new collection 
from Flutterby  'Magical AF', if you haven't got your hands on this as yet, be quick! 
I don't think it will last long.

To start my layout, I traced a series of circles onto my page and painted them with paints matching the elements in the collection. I added highlights in black and gold foil to add a little shadow and sparkle to my design. 

Then cracking into my stash of older Flutterby Stencils, I used the star stencil and a distress tool with black ink to add star highlights across my page.

Let's take a closer look at the cool AF elements from the new collection!


 Just look at that cute unicorn! I fussy cut him out from the Everyday Etc Cards from the kit and paired with a great Die Cut makes for a great title.


Balance the other side of your layout with your secondary title, 
a cute little unicorn flair button and paperclip from the new kit. Make sure you add some cute little star stickers from the magical-af-sticky-quotes.


Lastly, add some colour and sparkle under your photos by using some of the gorgeous little backgrounds from the Filler Cards and perhaps a page tab or two.


That's it from me today, I hope you have been inspired to try the new collection and perhaps a bit of mixed media to match 😀😀😀😀💗

Hugs xx

Elisa Ablett


Friday, 25 January 2019

Cool as Bro || Elisa Ablett


Hi Flutterby Fans,

Elisa here from the design team with my latest project for Flutterby Designs, a mixed media boy layout featuring a monochromatic palette plus the colour teal! 

Who else is a teal fan?

With this layout I started with spraying teal colour through the Star Stencil, letting that dry completely before adding black ink elements by smoothing black ink through the He Said She Said Stencil and the Got Letters stencil.

Then adding some funky distressed stamping with Viva Las Vegas Stamps.

Though I think the winner in my eyes is the monochromatic everyday filler cards of the 'Blank Pallete' collection. Perfect to match with any colour/s and looks fab with wood veneer (speech bubbles).

Here are the close ups !


Thanks for stopping by the blog today,

Make sure you pop on by the Inspiration page to say hi!

Elisa x


Sunday, 13 January 2019

Crazy with my Wifey- Chrissi mannix

Hi Lovelies
Welcome to my first blog post for Flutterby Designs! I'm so excited to be joining the team this year. I absolutely adore the Flutterby style and flair and couldn't wait to share my first project with you all.
This is a picture of my best friend and I, my Wifey causing mischief as we do, this time at Movieworld. I had the bright idea to use the purples and blacks from the Xtreme Teen Collection. 
I had this collection out, as I was using it for a project life spread (stay tuned for my next post), and thought it would work great for this picture.
I knew I wanted to use this awesome Flutterby star stencil with some texture paste, and have a block of colour to it. I decided on grey, so I could then add a pop of a bright colour.

I used the Xtreme Teen Every Day Etc cards to layer behind my picture, and to add the colours to my layout- This is where i pull the purple from.


I love making mixed media backgrounds, and throwing paint is one of my favorite things to do. I used some very fluid paint to get my splatters and paint drips. Be warned, it IS a messy process, but oh so much fun lol. Just cover up anything you don't want splattered-like your phone lol. 
I love the quotes and phrases in the Every Day Etc cards, and how they can be cut up and used as embellishments and design elements. I love this troublemaker, misfit one. It was just too perfect for this layout. I also used a few tabs from the Sentence Enhancer's Collection to add to my photo layers.

Then I just added my title, using 2 different alpha sets, and a few puffy stars and enamel dots, and I was done. I do love how this turned out, and I hope you liked my first project as part of the 2019 Flutterby DT. I cant wait to share more projects with you.
Untill next time lovelies.
Chrissi xxx

Friday, 4 January 2019

Crazy Good Together | Rachel Dutko


Hi everybody, and a Happy New Year to you all!

Today I am sharing my first project for 2019 for Flutterby Designs.

I am using the fun 'We Are' collection to document these fun photos of my sons 
getting ready for their end-of-year school concert last year.


I have added a strip of paper from Cocoa Vanilla Studio, then layered 
some Everyday Etc filler cards under my photos for a pop of colour.


For my title I added the 'crazy' word from the Die Cut Bits & Bobs pack 
as well as a phrase fussy cut from an Everyday Etc. card.


I added some stickers from the Sticky Quotes, a page tab, and a flair button
I also added a circle from Charm's Creations.


I've added a couple of phrases from the 'Monochrome' Snippet Strips set.
I've finished off the page using the Starstruck stencil, 
splatters and some wood veneer stars.


Thanks for looking
Rachel x x


Tuesday, 13 November 2018

Weird as Me. Poop.| Allara Bamforth

Happy Tuesday,

I'm back on the blog today with a very quick and easy layout that really didn't take long at all! Sometimes I love being able to create no fuss layouts that don't take too much effort but still look amazing. This way I can get lots of layouts done without spending hours on them. That's why I love Flutterby Designs goodies, so easy to mix and match and create a fab layout!!

My layout today uses the I'll Keep You 12 x 12 paper for the background and a couple of strips from 'Love for All' paper from the 'Happily Ever After' collection. I've taken the 'Halftone' and 'Migraine Madness' Stencils and applied some Flutter Colour Paint in Grape Soda, Bahama Blue, Orange Goldfish with a sponge. Overlapping the designs from bottom left to top right. This complements the paper and the grape soda matches in with the title.

Once the background was dry, I drizzled some of the Artic White and Bahama blue over the stencilled parts. Added to this I picked some of my Oxide Inks to add some splashes over the top.  The title is from 'What Makes Us Work' 12 x 12 paper form the 'Happliy Ever After collection. To finish off I've used the 'Stargazed Stencil' to add some stars to triangles around my son's head.


Thanks for taking a peek.

Till next post,


Monday, 26 February 2018

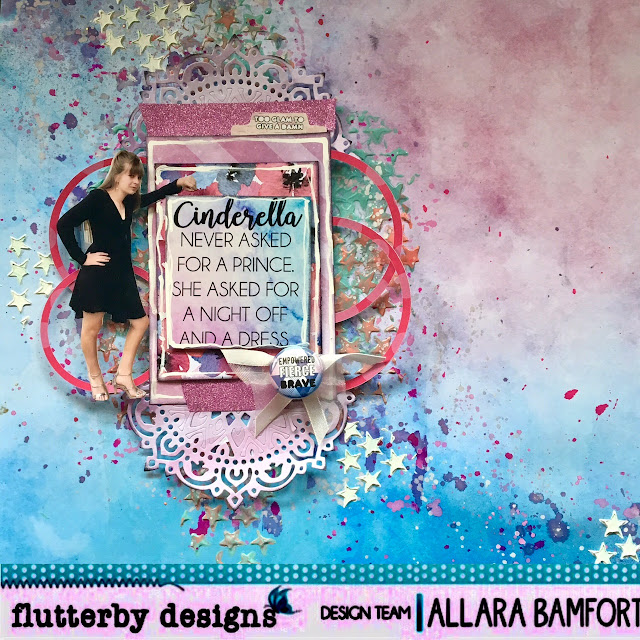
Cinderella Never Asked for A Prince by Allara Bamforth

Hello,

Allara here on the blog again with another fun layout using mostly 'We Run the World' collection goodies. Another quote well suited to my middle child for her year 10 formal - although she does not frock up or wear high heels or makeup very often, she totally owned it as you can see from her fabulous pose! When she saw this layout I'd made she said 'That's so true' :)


Products used from Flutterby Designs:-

Mixed Media Fussy Circles
Flutter Colour Paint
Stargazed Stencil
Everyday Etc Cards - We Run the World
We Run the World Paper - Michelle and Diana
We Run the World - Flair Buttons 1


Now don't forget tonite to tune in at 8pm for the NEW RELEASE - GOOD VIBES ! I cannot wait to begin scrapping all my fun road trip and summer pics with this awesome collection!!! Here is a peek!


Till next post,

Allara


Friday, 3 November 2017

FLUTTERBY RETREAT | KRISY PODOLAK

Hi Flutterby Lovelies,

After I go on retreat I usually like to write a big blog post about everything that I loved.  This year I was lucky enough to road trip to the Flutterby Retreat at Lake Keepit in NSW.  I haven't had a chance to write about it as uni priorities have taken over by I have managed to scrap some pages which I am really happy with.  They sum up the fun of the weekend.  I will say one thing, if you are able to, go on the Flutterby Retreat.  It is so much fun and if I had unlimited money, I'd be booking in for the next 5.

I have two layouts to share....

For this layout there is a few exclusives that you would receive in your welcome pack if you were to attend retreat - you know the itinerary, tags and little extras.  I created the background using Flutterby paints and stencils. I then added stamping and all the layers.  The Retreat button is also from the Flutterby store but you'll have to go searching because I have no idea what number it is.

I am loving using paints to create backgrounds at the moment, so I used the Flutterby Paints to create this rainbow background.  Then I added some stencilling using the stars and different parts of the words stencils.  Once It was dry I added some stamping and then my layers and photo.  I kept the photo in black and white so it would stand out against the bright colours.

Here are some close ups... You will spot some tiny word stickers, a flair button and enamel dots that you can find in the store.


Thanks for stopping by today. I hope I have inspired you with some bright rainbow colours and the need to go on retreat!

Krisy xx