Tuesday 31 July 2018

"Smile" | Adele Toomey

Hi scrappy peeps!

Today I dived in and used the "We Run The World" goodies from my latest Flutterby Designs order and created a pretty layout documenting Archie's first photos with his Great Nan.


Initially I started with a different layout design using strips of paper, but as soon as I saw this DELICIOUS pinky, purply piece I knew I had to change direction and use it!


I used some floral stamps from my stash and added these to contrast against the beauty of the mixed media feel of the background paper.


I also used several of the stickers from the "We Run The World" collection to add a title to my layout as well as some heart embellishments.


I hope you enjoy watching my accompanying video to see the whole scrappy process! Have an awesome scrappy week!

Adele :)

Sunday 29 July 2018

Stop Being a Smartass - Sweetheart by Allara Bamforth

Happy Sunday!

Hope you enjoying your weekend, what ever you are up to. I'm still recovering from the fabulous Flutterby Designs - Create by the Lake Retreat last weekend! It is SO much fun and brings together so many amazingly talented and creative souls. If you haven't been, you really need to be a part of it - so keep an eye for registrations for next year!

This layout is one I created at retreat. I started off using my Brayer to smoosh over Flutter Colour Paints - Fire Engine Red, Orange Gold Fish and Sunshine Yellow. Once this was dry and using a sponge and some Artic White paint through the Migraine Madness Stencil, randomly placed some stencilling all over my page.

Then using the All You Need is Love Stencil, I blocked down the page with some transparent gloss texture paste. Once this was dry I used some black dylusions ink to run out from under where I planned to place my photo, so that the outline of the Love stencil could be seen randomly down the page.

I mounted by photo using Everyday etc Filler Cards from the Happily Ever After Collection and a title was made from the Everday Etc Cards both underneath the photo and to the left hand side. A Photo Tab from Happily Ever After Collection was slotted in behine and a Flair Button from my stash of Flutterby goodies.

The entire background was the layout to begin with but I felt the photo was a little lost against the busyness of the background, so at this stage I decided to cut it up and add it to another white background with a few strips to the side (and also now have another spare piece for something else). To finish off, I pulled out my trusty FineLine applicator filled with Flutter Colour paint and drew so squiggles but then also used my favourite stitch stamp of the moment from 49 and Market. Then last but not least decided to use some of the left over 'muslin' from the Blind Scrap Challenge we did at retreat.


Thanks for taking time to have a peek!

Till next post,

Allara xx


Saturday 28 July 2018

Sea Sun Sand | Rachel Dutko

Hi everyone

Is anyone else like me and finding themselves in the depths of winter 
but pining for Summer and some beach time?? 
Or are you lucky enough to have some sun where you are?

Well today I have a beachy layout to share, as a reminder of those Summer vibes.


I created my background by scraping some 'Tropicana Teal' Flutter Colour Paint 
onto some Kraft cardstock.
Once the first layer was dry I added some 'Sunshine Yellow' Flutter Colour Paint 
Once the paint was dry I then traced through the stencil with a fine-tipped pen. 


I layered some Good Vibes Only Everyday Etc filler cards under my photo. 
I also used an 'I Need Vitamin Sea' quote from an Everyday Etc card


I added some stickers from the Good Vibes Only Sticky Quotes. 
I also added the Sea|Sun|Sand die cut piece from the Good Vibes Only Die Cut Bits & Bobs pack for my title.  


I fussy cut the sunnies and palm tree from some Everyday Etc cards, 
and added a Flair button over a Charm's Creations arrow.


I added some tiny Kraft sticky quotes, as well as a page tab.  
I also added some different enamel dots, from the Neon and Bold packs.


Thanks for looking
Rachel x x


Thursday 26 July 2018

Always have fun together | Tamara Buckler

Hey Hey Flutterby Friends,

Well, I'm sure a lot of you are coming back down to earth after the 'Create by the Lake' retreat last weekend, and the rest of us are slowly getting over our FOMO (me!), so I thought it was time to drop in and share my latest layout with you all.

This one is a bit of a stash buster, as I wanted to challenge myself this week to make a black and white layout. B&W is often my go to, but I usually add in a pop of another colour.  I did really well with this challenge, and stuck to the B&W theme until the very end when I found the perfect Flutterby Flair Button, and then I had to add in some gold. Ha, life's tough when you have to make these big choices!!!


I started this page by fussy cutting the 'together' from one of the Everyday Etc Cards "Happily Ever After" collection, it fit perfectly down the side of this pic of my nieces and daughters. I then layered up some of the Everyday Etc Filler Cards behind my photo, using quite a few from the B&W pack and from the Happily Ever After pack.


I then adhered quite a few of the white tiny sticky quotes and white sticky quotes around the photo to give extra interest and extra texture to the page. I figured this was a good excuse to use these up, but who's kidding, I'm going to buy more! I covered the sticky quotes with matt gel medium to make sure they stayed stuck on the page and then added a layer of gesso over the top to blend them all together.


I then added some black ink splatters, and was pretty well going to leave it there, but realised there was a empty spot to the top right of my pic that needed filling. I started to dig through my stash, and came up with this metallic 'we are family' flair button - it was perfect, so as they say, I made it work!


To tie it all together, I added some gold splatters, some gold glitter hearts, and added another word to my title in gold alphas.


So now my layout is B&W with a good splash of gold, and I love it!

Thanks for stopping by to check it out today!!

Big Loves,
Tam xo


Monday 23 July 2018

Love You | Belinda Spencer

Hey Flutterby peeps!!

Belinda here with you today to share my latest layout featuring the totally awesome Happily Ever After collection.

'Love You'


Just look at that stunning rainbow background paper! I LOVE the 12 x 12 papers in this range so much. I especially love that they require very little fuss so you can knock out a layout super quick. Here I swiped some gesso onto the paper using a silicone brush. Once dry I added some stencilling using Golden Light Molding Paste.


Then it was time to layer up!! The filler cards are so perfect for layering under your photo. Here I chose filler cards that matched the background colours.


I added a fussy cut on top of the filler card pile followed by my photo.


I finished with a scattering of sweet little embellishments, my title and some Sticky Quick Quotes.


Here's what I used:

HAPPILY EVER AFTER:
- Everyday Etc Filler Cards
- Die Cut Bits & Bobs
- Wood Veneer Bits
- Washi tape
- 12" x 12" Patterned Paper "Love For All"

- Sticky Quick Quotes "Tiny Rainbow"
- Fussy Cuts
- Enamel Dots Neon
- Stencil


Wednesday 18 July 2018

Happy Wife Happy Life | Sue Plumb


Hi Flutterby peeps!
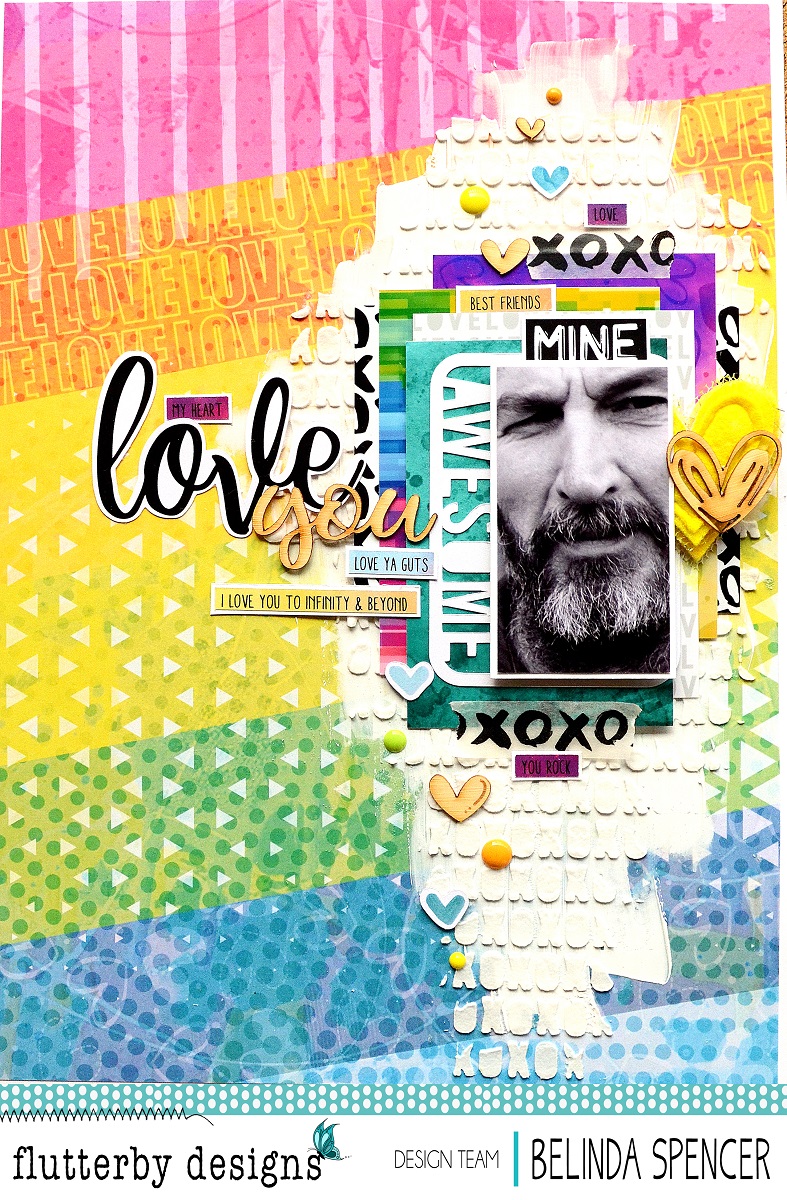
Sue Plumb here today to share my latest design team project with you. This mixed media scrapbook page was created using the recently released 'Happily Ever After' collection, along with Flutter Colour paints. It also features a selfie of my hubby and I that was taken just after we had dropped our twin boys off for their first day of school. 


I began my page by creating my background. I was inspired by some of the multi-coloured patterns featured in the 'Happily Ever After' collection and wanted to make a background using the same colour palette. I used Flutter Colour paints - Aquamarine Dream; Tropicana Teal; Green Limousine; Yellow Zest; Raspberry Punch; and Grape Soda. To apply the paint I worked in layers, adding swipes of colour with an old gift card and drying them off in between. I used horizontal and vertical swipes to help add to the "randomness" of the design. 


Over the top of the paint, I used the 'Happily Ever After' stencil, and applied some Colour Blast "Snow White" Colour Paste though it, which is lovely and subtle and perfect for backgrounds when you don't want the words or images overwhelming your page. 
I also added some torn pieces of the rainbow heart washi tape from the kit; and splattered some blue ink around my page. 


I chose the multi-coloured square that had inspired my background from the 'Blanket Thief' 12x12" patterned paper as a mat for my photo; then added some extra layers using Everyday Etc filler cards from the range and some paper doilies.


I wanted to add an extra layer to my page, but didn't want to overwhelm the paint or papers I had used; so I added some die cut suns that I cut from white cardstock. (I thought the suns worked well with the "happy" theme and the shape looked great layered over the painted background.)
I also added fussy cut geo heart that I tucked into my layers. 


I then added my title, which I had fussy cut from one of the Everyday Etc cards from the collection and placed it above and below my photo. (The little hearts piece was fussy cut from another card.) The snookums die cut was one I had left over from the 'Mad About You' Die Cut Bits & Bobs pack, and it worked perfectly here. I also added a white Tiny Sticky Quote above it.  


I decided my hearts needed balancing with a third heart element on the left of my page; so I chose a Charms Creations handmade heart to add a little texture to the page.
To finish it all off, I stamped the date and used a grey felt pen to add my handwritten journalling. (I usually use a black pen, but I felt that the black would have dominated the page too much, so went with the soft grey instead.)


That's all from me today. Don't forget that with the annual Flutterby Designs 'Create by the Lake' retreat on this weekend, that the online store is closed until Thursday 26th July.
For all those attending I wish you a wonderful weekend! (I am super sad I won't be there to support Neet this weekend, so please give her extra hugs for me and make sure her glass is never empty - she works her ass off to make this retreat a success!)
Until next time, happy scrapping! 


Monday 16 July 2018

Crazy Together by Adele Toomey

Hi scrappy peeps!

Today I chose to scrap a selfie with the one and only Anita!! OF COURSE I had to reach for my beautiful Flutterby goodies, and decided to go with the Happily Ever After collection because I love her oh so much :P


I love how the bright colours of this collection match our crazy photo taken at last year's Flutterby Designs Retreat. I used some of the Everyday Etc cards to create a frame for my photo and as part of my title too.


I created the background by using some texture paste through one of my fav Flutterby stencils and popped some hearts across my cardstock. I added watercolour and let it drip through the hearts.


I added a sprinkling of enamel dots and some glitter hearts to add the finishing details, as well as tucking in a few page tabs behind my pic.


I added colour to this gorgeous large wood veneer using a paint pen, before adding glossy accents on top to achieve a lovely 3D effect. 


I hope you enjoyed my layout today! I can't wait to snap another crazy pic with this amazing girl at the Flutterby Designs Retreat this week! Who else will be joining us there??

Adele :)

Saturday 14 July 2018

Love Life by Allara Bamforth

Happy Saturday,

I'm back on the blog today to share my latest layout using the 'Happily Ever After Collection' with a cute pic of my daughter - just to show how versatile this collection is and how it can be customised to any theme you like.

This layout if quite minimalist for me! I'm usually a fan of covering up all the white space on my page but have been practising doing a few layouts with smaller photos and trying to be a bit restrained with my paint. I am really happy with how they are turning out. This one took no time at all and this type of style is great for getting layouts done quick!


My brayer has been my tool of choice lately to paint on the background, so using Sunshine Yellow and Grape Soda from the Flutter Colur Paint - Bright Set I roll out the yellow with the grape just over the top towards the bottom. Then with a little Raspberry Punch, Artic White and Black Mayhem in my Fineline Applicator, I swirl these colours over the top of the yellow and grape.

Once that is dry and using the Migraine Madness Stencil and some Distress Oxide Inks, I randomly stencil some of the circles on the background around the edges of the painted part. I also do the same with the Shake Your Tailfeather Stencil, although you can't see these as well. I also randomly splosh some of the distress oxide inks around the painted area and over my stenciled areas so that distress oxide ink does what it does best and blends.

Next I layered up my photo with the Happily Ever After Everyday Etc Cards Filler Cards and then added some Photo tabs, one from Happily Ever After and the other from the Flawsome Collection. I then added a Flair Button from the Happily Ever After Collection with a little purple and blue cotton underneath. I cut out the 'LOVE' title from the Happily Ever After Everyday Etc Cards and placed it over my painted background. To finish off I used some sticky hearts from the Happily Ever After Sticky Quotes and some Neon Enamel Dots.
This seriously was such a quick and fun layout. Please feel free to scrap lift and have a go! All products used have been linked back to the shop.

Till next post,

Allara Xx


Wednesday 11 July 2018

"You Rock" by Rachel Dutko

Hi everyone!

Today I have a bright and fun 12x12 layout of my boys to share-
"You Rock"


I created my background by adding some paint, then randomly added some lighter blue paint through a Halftone stencil
Once the paint was dry I then traced through the stencil with a fine Sharpie pen in random areas to highlight the dots.


I fussy cut my 'You Rock' title, as well as a star from some "Super Cool' Everyday Etc cards.  
I also used some 'Super Cool' Everyday Etc cards under my photo. 
I used a 'Fair Dinkum Chrissy" Everyday Etc filler card under my title.


I then added some Snippet Strips (from the Monochrome , Warm, and Cool sets) around the page, 
as well as some enamel dots and 
some wood veneer stars that I coloured with acrylic paint.


The aviator sunnies from the 'Good Vibes Only' Die Cut Bits and Bobs pack 
worked perfectly on this page. 


I also added a flair, a Kraft tab photo cut out, a ticket, and a page tab 
from the  Kraft Notes 5, Baby Boy and Blackboard Notes 1 sets. 


Thanks for looking
Rachel x x