Showing posts with label Sue Plumb. Show all posts

Wednesday, 9 January 2019

We Are Crazy | Sue Plumb


Hi everyone!
As you have likely already seen with the recent announcement of the new Flutterby design team, after over two years as a member of the DT, the time has come for me to step down. I can't explain what a difficult decision it was to make, but I felt it was time to make room for some fresh faces and inspiration. I have loved every minute of being part of this team and flying the Flutterby flag.

So without further ado, here is my final project share - a fun, 12x12" layout created with the recently released 'We Are' collection...


I began this page with some fun photos of my daughter and her friend that were taken when they attended a circus skills workshop during the school holidays. I used one of the papers called 'We Are' from the 12x12" paper pack and applied some Arctic White Flutter Colour paint with a brayer to cover some of the pattern in the focal area of my page. 


I then took some of the 'We Are' Everyday Etc filler cards and layered them to create a mat for my photos. I also added some scrap cardboard to the back of my photos to help pop them up from the page. I tucked one of the 'We Are' page tabs in behind my photo as well. 


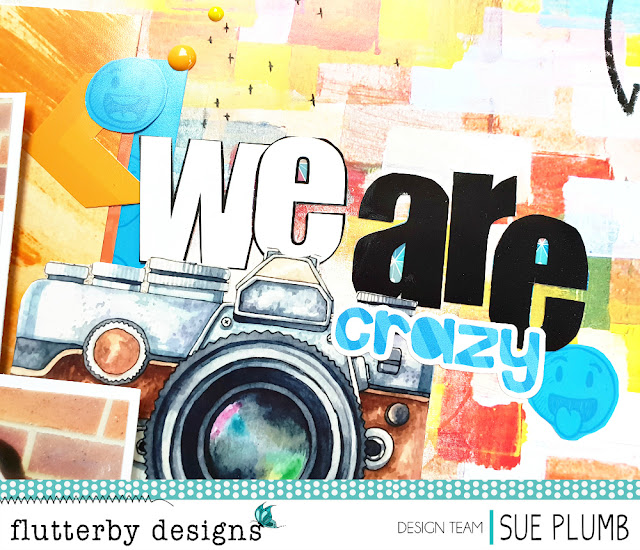
The large camera and the we are title words were all fussy cut from some of the 'We Are' Everyday Etc cards. The word crazy was from the 'We Are' Sticky Quotes sheet, as was the we're all mad here sticker I used near the top of the page.


The little emoji faces I used around the page to help tie in the blue colour were fussy cut from one of the coordinating filler cards, along with the yellow chevrons I placed to help draw the viewers eye into the photos.

The funny quote I added underneath my photos was from the 'We Are' Everyday Etc card pack, and was a perfect supporting sentiment for this page theme. (Both these kids would agree with it! hehe)


I thought my layout needed a little more black to help finish it off, so I used the where is my mind? sentiment from Viva Las VegaStamps and stamped it several times around the page with black ink. I also used my Stabilo All pencil to add some small marks and a doodled page border.

Finally, I added a few enamel dots for a little more visual interest, and my handwritten journalling using a Sharpie and I was done.


So that's a wrap on my final layout for Flutterby Designs. I would like to take this opportunity to thank Anita for having me on her team - I love this lady so much! I have had a blast creating with her products alongside so many talented ladies. 

Thank you also to everyone for the support and kind words for the work I have produced over the last couple of years. It really makes all the time you put in as a designer worth it when you hear that you inspire other people. I am sure I will still "see" most of you around, and will most likely have some Flutterby creations to share in the Flutterby Inspiration HQ group.
Over & out.
Sue X

Monday, 17 December 2018

Family | Sue Plumb


Hi everyone!
Sue Plumb here to share my latest Flutterby design team project with you. Today I have a 12x12" mixed media scrapbook layout to share that features some of the recently released 'We Are' collection and a photo of my siblings and I together.


I had lots of painty fun creating this page, starting with some 'Tropicana Teal' Flutter Colour paint, which I applied to the bottom half of the page using a brayer. I then used a wide brush to apply some Dina Wakley 'Night' acrylic paint to the top half of the page.

Once the paint was dry I used a silver gelato to scribble some colour around the edge to form a rough border, which I then blended a little using a water brush.


Over the paint on the top half of the page, I used the 'Bubble O'Fun' stencil and some Colour Blast 'Steel' Colour Paste to add some texture in a few areas. Over the bottom half, I used the same stencil and some grey ink with a sponge dauber to add a little detail. (Unfortunately this stencil is no longer available, but there are a great range of alternative designs available HERE)


Next, I created a layered mat for my photo using some of the 'We Are' Everyday Etc filler cards. I also added some frayed gauze and a frame from the Die Cut Bits & Bobs pack that I cut in half before adding my photo on top; then tucked in a couple of the 'We Are' page tabs


Lately I have been trying to incorporate some older products and mix them with new, so I took the opportunity to include some washi tape from the 'Good Vibes Only' kit. I also included some of my Flutterby staple supplies - white Tiny Sticky Quotes and enamel dots.


On the bottom half of my layout, I wanted to use a variety of words created from different materials arranged in a sort of word cloud. I started with the large LOVE word from the Die Cut Title Set as the base, adding the word family from the gorgeous 'We are Family' Teal Acrylic Title pack.
In keeping with my mission to include a few older supplies, I overlaid the forever & ever wood veneer piece along the bottom.


On the left side of my word cloud, I added hugs from the Die Cut Bits & Bobs pack, along with a wood veneer heart.
To keep my page balanced, I also tucked a small wood veneer star in behind my page tab above my photo.


Finally, I added the this is us flair button from the 'We Are' flair button set #2 into my word cloud before finishing off my page with a little scribbled border detail using a Stabilo All pencil.

Thanks so much for stopping by today so I could share this with you.
Until next time, happy scrapping! X

Monday, 3 December 2018

Us Together | Sue Plumb


Hi everyone!
It's Sue Plumb here to share my latest design team project with you. Today I have a mixed media scrapbook layout featuring the new 'We Are' collection and Flutter Colour paints. It also features a fun (part) family snap I took a few months ago...we are so not normal! haha


I started my page with white cardstock and Flutter Colour paints in Cotton Candy Pink, Tangerine Orange, and Yellow Zest. I thinned these down slightly and used a brush to create a rough painted background, blending the colours as I went. I then used Arctic White and applied it with a brayer to the focal area of my page to strip the colour back a bit. 


After I had the paint down, I used the 'Happily Ever After' stencil with some acrylic modelling paste, then dried it off with a heat gun. 

I then cut some pieces from some of the 'We Are' Everyday Etc filler cards and layered them together to form a mat for my photo, along with some small torn pieces of washi tape from my stash.


Once I had the paper pieces in place, I used the 'XO' stencil (unfortunately, no longer available);grey StazOn ink and a dauber to apply some XOs to several areas of my page. (You could use any small pattern stencil for this, it was simply to bring a little darkness into the page.)

I then added a paper doily and some frayed gauze to my paper layers before adding my photo on top.


Tucked in around the top right corner of my photo I added a manila luggage tag tied with twine; the this is us page tab; and the large heart I had fussy cut from one of the 'We Are' Everyday Etc cards. The die cut word together that I added onto my photo came from the 'We Are' Die Cut Bits & Bobs pack.


Below my photo I added the normal family quote I had also fussy cut from another of the Everyday Etc cards; along with the yellow heart sticker from the 'We Are' Sticky Quotes sheet; and the small LOL sticker from the white Tiny Sticky Quotes sheet.


To the left of my photo I created another cluster using a Charms Creations DIY heart, topped off with the family fun flair button from the 'We Are' flair buttons set #1 and another Tiny Sticky Quote.

I finished off my page with a splattering of Colour Blast 'Soot' Colour Artist Ink and some stamped phrases using a Typo roller stamp.

Thanks for stopping by today so I could share this with you. Don't forget to stop by the Flutterby store to see what's new, including some awesome ideas for Christmas gifts! Check them out HERE
Until next time, happy scrapping! 

Sunday, 18 November 2018

Together | Sue Plumb


Hi everyone!
Sue Plumb here to share my latest Flutterby design team project with you. Today I am sharing a 12x12" mixed media layout that features the brand new "We Are" collection, that was released to the Flutterby Designs store on Friday night. This range has proven to be very popular already, so if you haven't snapped some of it up yet, make sure you get on it!

So, for the page I created with the "We Are" collection, I decided to use a beautiful photo of two of my kids that I took recently. (I was aiming for all three of them together, but there is always someone who doesn't play along and ruins my fun!)
I was actually lucky enough to create this layout on retreat at the Sunshine Coast last weekend, while the Flutterby boss lady herself was a mere table away from me!


I began my layout with one of the sheets from the 12x12" paper pack, called "The Story of Us". This paper is designed like a large sheet of notebook paper and it was the perfect canvas for me to add some of my Flutter Colour Paints to it. I used a combination of brayer, brush and my fingers to spread the paints around, layering the colours until I achieved the look I was after. 

I then added some stamping using background stamps from Viva Las VegaStamps and some sweet hearts from Cocoa Vanilla Studio with teal Archival ink; before using my Stabilo All pencil to add a few random scribbles on top.


I used a few different "We Are" Everyday Etc Filler Cards to layer behind my photo - cutting, tearing and even punching them to add interest. I also added the grateful page tab from the "We Are" Page Tabs sheet. I then topped the papers with some frayed gauze to give soft texture, before mounting my photo on some scrap cardboard and adding it on top.
I then added a small heart from the Die Cut Bits & Bobs pack directly onto the corner of my photo.


Alongside the left edge of my photo, I added a cute handmade heart embellishment from Charms Creations, which proved to be the perfect spot to add the we are family flair button from the "We Are" Set 2 on top.

Below the bottom right edge of my photo I added a couple of phrases from the Sticky Quotes sheet, as well as one above my photo. Then, also from the Sticky Quotes sheet, I added the script word together at the bottom of my page.


To finish off, I added a few enamel dots; a small splattering of teal ink and stamped the phrase I love you lots with a roller stamp.

Thanks for stopping by today so I could share this with you. I hope I have given you a taste of just how fun and fabulous this collection is for scrapping all your family photos. 
Make sure visit the store to snap up all the new goodies (including a great range of mugs that are perfect for Christmas gifts!) HERE 

Until next time, happy scrapping!


Friday, 2 November 2018

Right Here | Sue Plumb


Hi everyone! 
Sue Plumb here to share my latest design team project with you. Today I have changed things up and am keeping it simple with "clean" layout for a change. I have been incredibly busy lately, (something I am sure many of you can relate to), so I decided to create a quick page using my take on a grid style design and some older items from my Flutterby stash.


I wanted to document this super fun snap of my friend Krisy Podolak and I at the Qld border as we returned home from the Flutterby retreat last year.

I started with a sheet of wood grain patterned paper from Cocoa Vanilla Studio for my layout base, as I knew the warm wood tone would coordinate well with my photo and the cards I had selected from the 'Any Direction' Everyday Etc card pack. 


I shuffled the card pieces and the photo around on my page until I was happy with their placement then stuck them down immediately, knowing I would work all the embellishments into the remaining spaces.

I started with a couple of stickers - the super cute sunglasses and road trip sticker were from the Good Vibes Only Sticky Quote sheet; whilst the mix tape sticker was from the Xtreme Teen Sticky Quote sheet. 


I added the click click click and always find adventure stickers from the Blackboard Sticky Quotes sheet; and used Blackboard Sticky Alphas to add the border mole patrol words. 

I dug through my wood veneer stash, finding the word adventure, a camera and some wood veneer stars. 


I cut the little aqua enjoy the journey phrase from one of the Snippet Strip sheets from the Cool Snippet Strips pack.

At the top of my page I added the enjoy the journey flair button from set #394.


Once I had everything down on my page, I splattered a little white mist on my page then stamped the date and I was done. (I told you it was a simple one today!)

Thanks so much for stopping by so I could share this with you. I hope I have inspired you to dig through your Flutterby stash and create something using up some older bits and pieces too. 
Until next time, happy scrapping! 


Saturday, 13 October 2018

Peace Love Pineapples | Sue Plumb


Hi everyone!
I am here today to share my latest design team project created for Flutterby Designs - a mixed media layout featuring the 'Good Vibes Only' collection and Flutter Colour paints. I documented a photo of myself, my hubby and a couple of our mates that was taken at a local event on Australia Day. (In case you are wondering how the pineapples are relevant, the event featured a pineapple throwing competition.)


To go along with the theme of Australia Day, I chose a green and gold colour scheme. I used Flutter Colour paints to paint my background - first using a brush, then a brayer, and finally my fingers to add some highlights. 


On top of the paint I added some Colour Blast Colour Paste using the super cute 'Be a Pineapple' stencil. I then dropped some green Colour Blast Colour Artist Ink randomly over the top before drying it off. 


Next I took some of the 'Good Vibes Only' Everyday Etc cards and created a layered mat for my photo; then added some frayed gauze for texture before adding my photo on top. I tore up some small pieces of washi tape from the 'Good Vibes Only' kit and placed them around the page.

I fussy cut my peace love pineapples title piece from another of the Everyday Etc cards, overlapping the corner of photo with it, and popping some foam tape under the corner to help keep it up off the page. I then added the hello there flair button from set #286 on top.


I added some stickers from the 'Good Vibes Only' Sticky Quotes sheet around my photo as well as some wood veneer pieces. I also added the good vibes only wood veneer further down my page. I decided my page needed a little more black so I added a few black Tiny Sticky Quotes to the page.


To finish off, I added some enamel dots; my handwritten journalling; a few stamped phrases; and some splatters of black ink.

I am super excited to add that I actually made my FIRST EVER process video for this page. I would love for you to pop over and check it out...


Thanks for stopping by today so I could share this with you.
Until next time, happy scrapping!

Monday, 1 October 2018

This Is Us Documented | Sue Plumb


Howdy peeps!
Welcome to October and happy Monday! (If you are smack-bang in the middle of school holidays like we are here, you have probably lost track of what day it is by now.) I am here today to share my latest design team project - a fun mixed media scrapbook layout featuring the 'Happily Ever After' collection and a photo of my hubby and I.


I started my page by creating my background on a sheet of white cardstock. (I used Bazzill Marshmallow so that it could handle the wet media.) First, I applied some Colour Blast Colour Artist Inks - 'Cranberry', followed by 'Slipper'. I added some extra water to move them freely around the page and help them to blend. I then dried it off with a heat gun before going back and splattering clean water over the top with a brush to take out some colour; leaving it to sit for a minute before soaking it up with some paper towel.


I then added some Flutter Colour paints - a touch of Cotton Candy Pink, as well as Sunshine Yellow; which I spread randomly on top with a brayer. After that had dried, I went back with some Arctic White and brayered some (more heavily this time) to pull the colour right back where my photo was going to be placed.

For the final layer in my background, I wanted to add some subtle detail and texture, so I used  the 'Happily Ever After' stencil with Colour Blast 'Snow White' Colour Paste before setting it aside to dry thoroughly. 
Look at the gorgeous shimmer...


With my background complete, it was time to add some papery layers on top. I used 'Happily Ever After' Everyday Etc filler cards, cut into various sized pieces to create a layered photo mat before adding my photo on top. I also tucked one of the coordinating 'Happily Ever After' page tabs in behind my photo and secured it with a staple.


I used some torn pieces of the lip printed washi tape from the 'Happily Ever After' Kit - placing my "kisses" randomly around my page. The title piece for my page - this is us documented was cut from one of the 'Happily Ever After' Everyday Etc cards.


I used a variety of heart stickers from the 'Happily Ever After' Sticky Quotes sheet scattered around the page. Also from the same sheet was the you+me=love sticker, which I popped up on some foam tape next to my photo, along with the for ever and ever banner. 


I love adding elements directly onto my photos. Here I added the together sticker in the corner of my photo, and then the you+me phrase sticker below it. (The Sticky Quote sheets always have a great variety of stickers to use, and they stretch a long way too!)
The final embellishment I added was the you are the bacon to my eggs flair button from the 'Happily Ever After' Flair Button Set 1


To finish my page I added a few small splatters of blue mist and I was done.
Thanks for stopping by today so I could share this with you. If you haven't seen the new A5 display folders or the stencils and page kits that were recently added to the Flutterby store, head over HERE to see whats new.
Til next time, happy scrapping!