Showing posts with label Happily Ever After stencil. Show all posts

Monday, 3 December 2018

Us Together | Sue Plumb


Hi everyone!
It's Sue Plumb here to share my latest design team project with you. Today I have a mixed media scrapbook layout featuring the new 'We Are' collection and Flutter Colour paints. It also features a fun (part) family snap I took a few months ago...we are so not normal! haha


I started my page with white cardstock and Flutter Colour paints in Cotton Candy Pink, Tangerine Orange, and Yellow Zest. I thinned these down slightly and used a brush to create a rough painted background, blending the colours as I went. I then used Arctic White and applied it with a brayer to the focal area of my page to strip the colour back a bit. 


After I had the paint down, I used the 'Happily Ever After' stencil with some acrylic modelling paste, then dried it off with a heat gun. 

I then cut some pieces from some of the 'We Are' Everyday Etc filler cards and layered them together to form a mat for my photo, along with some small torn pieces of washi tape from my stash.


Once I had the paper pieces in place, I used the 'XO' stencil (unfortunately, no longer available);grey StazOn ink and a dauber to apply some XOs to several areas of my page. (You could use any small pattern stencil for this, it was simply to bring a little darkness into the page.)

I then added a paper doily and some frayed gauze to my paper layers before adding my photo on top.


Tucked in around the top right corner of my photo I added a manila luggage tag tied with twine; the this is us page tab; and the large heart I had fussy cut from one of the 'We Are' Everyday Etc cards. The die cut word together that I added onto my photo came from the 'We Are' Die Cut Bits & Bobs pack.


Below my photo I added the normal family quote I had also fussy cut from another of the Everyday Etc cards; along with the yellow heart sticker from the 'We Are' Sticky Quotes sheet; and the small LOL sticker from the white Tiny Sticky Quotes sheet.


To the left of my photo I created another cluster using a Charms Creations DIY heart, topped off with the family fun flair button from the 'We Are' flair buttons set #1 and another Tiny Sticky Quote.

I finished off my page with a splattering of Colour Blast 'Soot' Colour Artist Ink and some stamped phrases using a Typo roller stamp.

Thanks for stopping by today so I could share this with you. Don't forget to stop by the Flutterby store to see what's new, including some awesome ideas for Christmas gifts! Check them out HERE
Until next time, happy scrapping! 

Monday, 1 October 2018

This Is Us Documented | Sue Plumb


Howdy peeps!
Welcome to October and happy Monday! (If you are smack-bang in the middle of school holidays like we are here, you have probably lost track of what day it is by now.) I am here today to share my latest design team project - a fun mixed media scrapbook layout featuring the 'Happily Ever After' collection and a photo of my hubby and I.


I started my page by creating my background on a sheet of white cardstock. (I used Bazzill Marshmallow so that it could handle the wet media.) First, I applied some Colour Blast Colour Artist Inks - 'Cranberry', followed by 'Slipper'. I added some extra water to move them freely around the page and help them to blend. I then dried it off with a heat gun before going back and splattering clean water over the top with a brush to take out some colour; leaving it to sit for a minute before soaking it up with some paper towel.


I then added some Flutter Colour paints - a touch of Cotton Candy Pink, as well as Sunshine Yellow; which I spread randomly on top with a brayer. After that had dried, I went back with some Arctic White and brayered some (more heavily this time) to pull the colour right back where my photo was going to be placed.

For the final layer in my background, I wanted to add some subtle detail and texture, so I used  the 'Happily Ever After' stencil with Colour Blast 'Snow White' Colour Paste before setting it aside to dry thoroughly. 
Look at the gorgeous shimmer...


With my background complete, it was time to add some papery layers on top. I used 'Happily Ever After' Everyday Etc filler cards, cut into various sized pieces to create a layered photo mat before adding my photo on top. I also tucked one of the coordinating 'Happily Ever After' page tabs in behind my photo and secured it with a staple.


I used some torn pieces of the lip printed washi tape from the 'Happily Ever After' Kit - placing my "kisses" randomly around my page. The title piece for my page - this is us documented was cut from one of the 'Happily Ever After' Everyday Etc cards.


I used a variety of heart stickers from the 'Happily Ever After' Sticky Quotes sheet scattered around the page. Also from the same sheet was the you+me=love sticker, which I popped up on some foam tape next to my photo, along with the for ever and ever banner. 


I love adding elements directly onto my photos. Here I added the together sticker in the corner of my photo, and then the you+me phrase sticker below it. (The Sticky Quote sheets always have a great variety of stickers to use, and they stretch a long way too!)
The final embellishment I added was the you are the bacon to my eggs flair button from the 'Happily Ever After' Flair Button Set 1


To finish my page I added a few small splatters of blue mist and I was done.
Thanks for stopping by today so I could share this with you. If you haven't seen the new A5 display folders or the stencils and page kits that were recently added to the Flutterby store, head over HERE to see whats new.
Til next time, happy scrapping! 


Wednesday, 18 July 2018

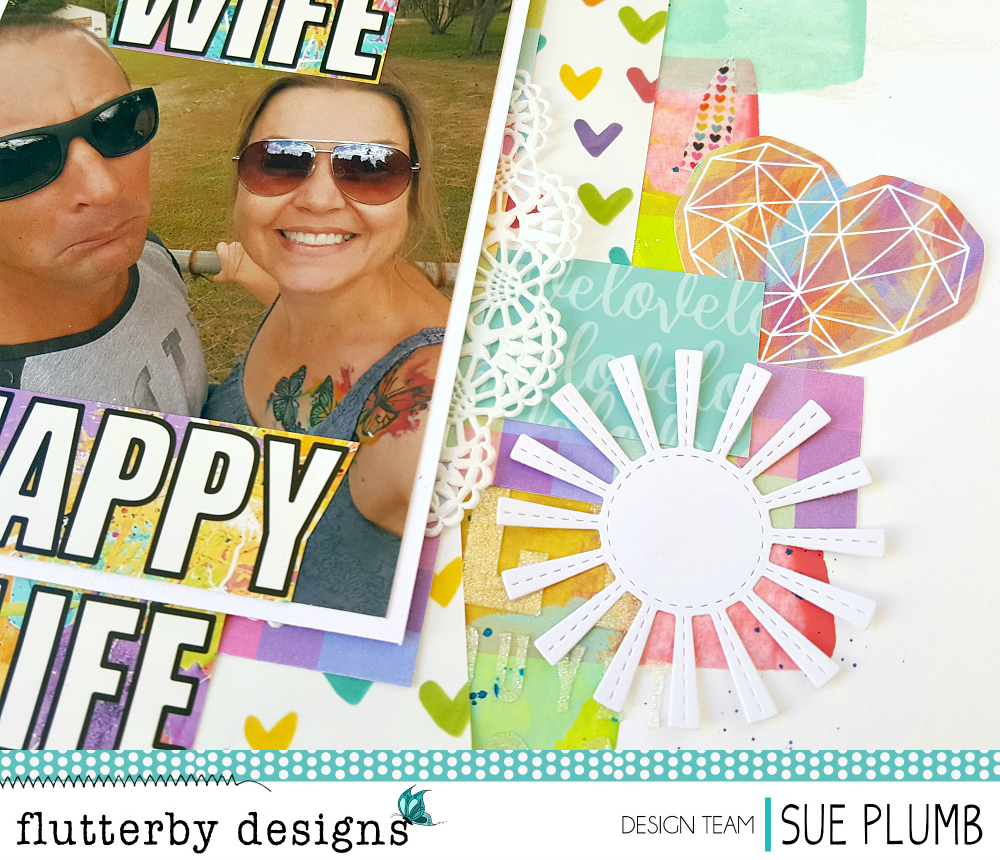
Happy Wife Happy Life | Sue Plumb


Hi Flutterby peeps!
Sue Plumb here today to share my latest design team project with you. This mixed media scrapbook page was created using the recently released 'Happily Ever After' collection, along with Flutter Colour paints. It also features a selfie of my hubby and I that was taken just after we had dropped our twin boys off for their first day of school. 


I began my page by creating my background. I was inspired by some of the multi-coloured patterns featured in the 'Happily Ever After' collection and wanted to make a background using the same colour palette. I used Flutter Colour paints - Aquamarine Dream; Tropicana Teal; Green Limousine; Yellow Zest; Raspberry Punch; and Grape Soda. To apply the paint I worked in layers, adding swipes of colour with an old gift card and drying them off in between. I used horizontal and vertical swipes to help add to the "randomness" of the design. 


Over the top of the paint, I used the 'Happily Ever After' stencil, and applied some Colour Blast "Snow White" Colour Paste though it, which is lovely and subtle and perfect for backgrounds when you don't want the words or images overwhelming your page. 
I also added some torn pieces of the rainbow heart washi tape from the kit; and splattered some blue ink around my page. 


I chose the multi-coloured square that had inspired my background from the 'Blanket Thief' 12x12" patterned paper as a mat for my photo; then added some extra layers using Everyday Etc filler cards from the range and some paper doilies.


I wanted to add an extra layer to my page, but didn't want to overwhelm the paint or papers I had used; so I added some die cut suns that I cut from white cardstock. (I thought the suns worked well with the "happy" theme and the shape looked great layered over the painted background.)
I also added fussy cut geo heart that I tucked into my layers. 


I then added my title, which I had fussy cut from one of the Everyday Etc cards from the collection and placed it above and below my photo. (The little hearts piece was fussy cut from another card.) The snookums die cut was one I had left over from the 'Mad About You' Die Cut Bits & Bobs pack, and it worked perfectly here. I also added a white Tiny Sticky Quote above it.  


I decided my hearts needed balancing with a third heart element on the left of my page; so I chose a Charms Creations handmade heart to add a little texture to the page.
To finish it all off, I stamped the date and used a grey felt pen to add my handwritten journalling. (I usually use a black pen, but I felt that the black would have dominated the page too much, so went with the soft grey instead.)


That's all from me today. Don't forget that with the annual Flutterby Designs 'Create by the Lake' retreat on this weekend, that the online store is closed until Thursday 26th July.
For all those attending I wish you a wonderful weekend! (I am super sad I won't be there to support Neet this weekend, so please give her extra hugs for me and make sure her glass is never empty - she works her ass off to make this retreat a success!)
Until next time, happy scrapping! 


Wednesday, 13 June 2018

You're My Weirdo by Allara Bamforth

Hello,

Allara back on the blog today with another fun layout from the Happy Ever After Collection!

So this layout actually started as an extension of the previous layout from May 27th, You are the Stars. All the Flutter Colout Paint - Bright set that I had used on the previous layout, I  applied with a brayer. So after rolling each colour over the my previous page, I cleaned my brayer on the top of my next page - so as not to waste any paint and created a really cool looking distressed back ground down half of the page.


Using the I Heart You Stencil, I've applied some Artic While Flutter Colour Paint across the top of the page and then painted some Raspberry Punch down the side of the white hearts. I then added some stamping on the Raspberry Punch. Pulling out the I Heart You Stencil again I've added some hearts, this time with Black Mayhem Flutter Colour Paint. I've outline the the hears with some White and Black Paints Pens. Next I've dipped the end of paint brush into the Tropicana Teal Flutter Colour Paint to make some dots to create more interest and splattered some of the white paint over the back ground. Then using the All you Need is Love Stencil and my black marker I've added "Love" over the page.

I've then layered my photo with the Everyday Etc Filler Cards and from the 12 x 12 Paper Pack - Happily Ever After Collection and the What Makes us Work page, I have added one of the quotes. Finished it off with the Nuts About You Flair from the Happily Ever After Flair Buttons 2 Pack. And coloured a litle bit of hessian for some texture.

Thanks for taking a peek at my creation this time around and make sure you pick up some of these fabulous goodies through the Flutterbys Store.

Till next post,

Allara

Saturday, 19 May 2018

Life Together | Belinda Spencer

Hello!

Belinda here today to share a layout featuring the BRAND NEW Happily Ever After collection.

This is such a fun collection and as I was searching for (embarassing) photos of my hubby and myself I realized that we just don't have enough photos of us together. I need to rectify that!

I did manage to find one of us together where I appear relatively normal but my hubby is pulling the weirdest face for some reason. It's probably because he hates being in photos so when I force him to he gets his revenge by messing them up. Little does he know these are the ones I love the best and I WILL scrap them for all to see. Revenge huh? He is an amateur. LOL

'Life Together'


I had so much fun experimenting with a beautiful rainbow of Flutter Colour paint on my background. I spritzed my cardstock quite heavily with water (yes it warps the paper but I can live with that) and also diluted the paints with water in a paint palette. I then used a soft wet paintbrush to drop the colours onto the page. If you have enough water on the page the paint will just bleed out and do its own thing. I love that. You can of course encourage it where to go using the paintbrush.


Aren't those paints just the prettiest colours? Even better they co-ordinate so perfectly with the Happily Ever After collection.

Next I had to add some stencilling with the fabulous new stencil 'All You Need Is Love'. I used white gesso for a soft look.


Then I layered up a fussy cut and the gorgeous 'Blanket Thief patterned paper from the paper pack as well as page tabs, filler cards, enamel dots and my title. I cut the 'Life' from a photo card and the little grey and white hearts from a filler photo card.


Products used:

* Green Limousine
* Raspberry Punch
* Sunshine Yellow
* Tropicana Teal

Well that's all from me today. Make sure you head over to the store HERE to grab this gorgeous collection for yourself.

Thanks for stopping by the blog today.
Belinda

Wednesday, 16 May 2018

We Stick Together | Sue Plumb


Hi everyone! 
Sue Plumb here today to share my latest design team project with you and my very first using the BRAND NEW 'Happily Ever After' collection! This range is so freakin' awesome - and right up my alley with it's gorgeous bright colours and a mix of sweet and sassy sentiments! If you haven't already got your hands on some of this... JUST. DO. IT.   
(You can check out all the new goodies in the shop HERE)


To create this layout I started with a fun photo of hubby and I taken at a 'Pimps & Hoes' fancy dress party last year and that STUNNING background paper - aptly named 'Love Potion', from the 'Happily Ever After' 12x12" paper pack. (The pack contains 10 different sheets of patterned paper which are all printed on 200gsm paper, making them ideal for mixed media as well.)


I used a variety of the Everyday Etc filler cards cut into various shapes and sizes to create a layered mat for my photo. (I so love the colour palette of this collection!) I then added some frayed gauze for a little soft texture before placing my photo on top.


I added two of the 'Happily Ever After' page tabs above my photo, which I just tucked in behind it.

I decided my page needed some extra details on the background, so I used the new 'Happily Ever After' stencil and some black Staz On ink to add the love you words and hearts. To do this, I simply masked off the areas around the section I wanted to use with some washi tape and then applied the ink using a sponge dauber.


Next, I turned my attention to my page title - reaching for my pack of Everyday Etc cards. I already knew EXACTLY which quote I wanted to use for my title because...well, why not? hehe I fussy cut it out and adhered it below my photo. (Hubby thought it was hilarious!)


After my title was down, I looked to add a few extra embellishments. (I didn't need a lot because the papers did most of the work on this page.) I wanted to create a little cluster on the horizontal strip to the right of my photo, so I added the I'm not sick of you yet sticker and the small purple heart sticker from the Sticky Quotes sheet.


I also added a handmade purple heart from Charms Creations; which I topped with the XOXO flair button from the 'Happily Ever After' set #1. I also added a few small torn pieces of the 'XO' washi tape that comes in the 'Happily Ever After' Kit (not available separately).

To finish off my page, I added a few splatters of white Flutter Colour paint (I watered it down slightly to make it easier to splatter); some scribbles of pencil; then I stamped the date and a few phrases and I was done.

Thanks for stopping by today so I could share this with you. I am sure you are dying to get your hands on the 'Happily Ever After' collection for yourself, so make sure you head to the shop HERE now to grab some.
Until next time, happy scrapping!