Saturday 30 June 2018

"I Am, You Are" | Adele Toomey

Hi peeps!

I am up today with a fun mixed media layout using the Happily Ever After collection. I love the stencil from this set and definitely wanted to use it in its entirety today to add to my background. I have also filmed a process video for this layout which I will link at the bottom of this post :)


I used some whipped spackle and the gorgeous turquoise shade of Flutterby Designs paint to create an extra focal point to my background. 

I searched for a sweet poem to use as journaling on my layout and typed it out using my electric typewriter. By cutting it into strips, I was able to make sure that my journaling didn't get lost into the background of my page. 


I hope you enjoy my process video! Have you used your Happily Ever After stencil yet??

Adele :)


Wednesday 27 June 2018

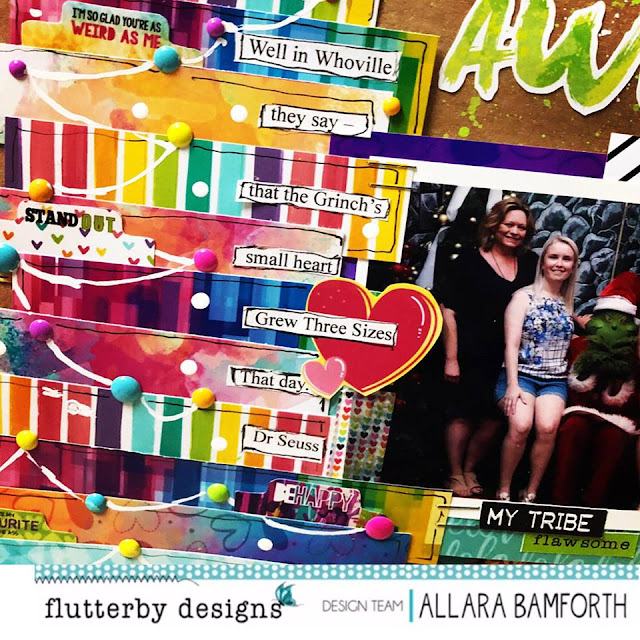
The Grinch's Small Heart Grew 3 Sizes That Day by Allara Bamforth

Happy Hump Day,

I'm back on the blog today with something a little different today and given that is only 6 months till Xmas and we are celebrating Xmas in July at Flutterby's camp - why not do a Xmas theme layout of my favourite character - The Grinch. We couldn't miss the opportunity last Xmas to get our Santa photo done with the Grinch.

Although I've mostly used 'Happily Ever Collection' in this layout, I've used bits and pieces from a few previous collections because they just all mix and match together so well!!


The tree is made up of strips and offcuts from the Happily Ever After Everyday Etc Filler Cards as well as the star on top. In between the strips, I've added various Photo Tabs from Happily Ever After and Flawsome collection. Also on the tree I've added some Enamel Dots - Neon to look like baubles.


The background is splattered with paint from the Flutterby Colur Paint - Bright Set, Artic White and Green Limousine. The photo is matted with more of the Happily Ever Collection Filler Cards and I've tucked a couple of Washi Tape pieces from the full Happily Ever After Kit.

Finished it off with a Flair Button from Happily Ever After Set 1 and a wood veneer snuck in from the Good Vibes Only - Wood Veneer Bits. The title is a die cut from the Mad About You collection and I've also added some stickers from the Blackboard Sticky Quotes and Flawsome Sticky Quotes.

Thanks for tuning and checking out this weeks blog post. Only 4 more weeks till the Flutterby Create by the Lake Camp - I'm so excited!!

Till next post,

Allara xx


Sunday 24 June 2018

'Happily Ever After' cards by Rachel Dutko

Hi everyone!

 Today I have some cards to share that I have 
created using the 'Happily Ever After' collection.


For card one I have used an Everyday Etc. filler card for the base colour. I die cut some brickwork from some black cardstock for some detail. I then fussy cut the 'LOVE' from an Everyday Etc. card to add on top. I matted the letters on white cardstock and inked the edges then adhered some of the letters with foam tape for some dimension.

I added a page tab and fussy cut some hearts from an Everyday Etc. filler card. 
I then fussy cut the "I" and the 'You' from another Everyday Etc. card to finish my sentiment.
I also added some enamel dots.


For card two I chose another Everyday Etc. filler card for my base colour. 
I matted this on some black cardstock with some foam tape.
I used a stitching die to add some detail around the edges and also die-cut a hole for the flair.


I added a 'love' acrylic piece and cut a word from a snippet strip for my sentiment. 
I also added some die cut foam hearts for some contrast.


For card number three I again used an Everyday Etc. filler card as the base, 
and a quote card from the Everyday Etc. card pack.


 The black quote is such a great contrast over the colourful background so my card didn't 
need too much embellishing - just a page tab, a flair and some gold thread and it was done!
I might keep this one aside for hubby's birthday!!


So that's it! Some great quick and easy cards using some amazing 
Flutterby Designs products for that 'wow' factor'!


Thanks for looking
Rachel x x


Wednesday 20 June 2018

Important | Belinda Spencer

Hello Flutterby peeps!!

Belinda here today to share another layout featuring the fabulous Happily Ever After collection.

'Important'


How cool is that background paper?!! That is the 'Mac & Cheese' 12 x 12 patterned paper in the range and I LOVE it. I really wanted to showcase that paper on my layout and therefore for a complete change I have not added any mixed media to my background. It makes a really bold statement just as it is and looks really cool combined with the kraft and black and white elements.


I cut a strip from the 'Boring Together' patterned paper to layer on top of the background paper and doodled a loose border around it with a black journaling pen.


I layered some Everyday Etc Filler Cards and added those to the layout followed by the 'important' Snap 2 Fussy Cut.Next I added my photo and slipped the bottom edge of it under the letters. I added a cool quote cut from the 'What Makes Us Work' patterned paper.


I also added a die cut, page tabs, washi tape, wood veneer bits and a cool flair button.


HAPPILY EVER AFTER:
- Washi Tape

Snap 2 Fussy Cuts
Page Tabs
Flair Button


Monday 18 June 2018

Blanket Thief | Sue Plumb


Hi everyone!
Sue Plumb here to share my latest design team project with you. Today I have a mixed media scrapbook page to share that I created using the new 'Happily Ever After' collection and some Flutter Colour paints. (And of course, my super cute kitty too!)


I started this page by creating an abstract background using Flutter Colour paints. The colours I used were Tropicana Teal; Grape Soda; Green Limousine; Stormy Grey and Yellow Zest. I didn't work with any particular result in mind when I applied the paint, I simply followed my instinct. I used a combination of methods to apply it - smeared with an old gift card; applied with a brush; and also with my fingers.


Once the paint had dried, I applied some black ink using a sponge dauber through the 'Hugs and Kisses' stencil. I then took some of the 'Happily Ever After' Everday Etc filler cards and applied some cut and torn pieces to my background, before mounting my photos on top.


I used two of the 'Happily Ever After' Everyday Etc cards and fussy cut the large LOVE word and also the blanket thief phrase. I then used 'Teal' Sticky Alphas to add the word couch to my page.


I then added the XOXO sticker from the 'Happily Ever After' Sticky Quotes sheet; along with the life is good and cheeky bugger phrases from some of the Snippet Strips.
The final embellishment I added was the good vibes only flair button directly onto my photo, from the 'Good Vibes Only' flair button set #1.


To finish my page, I splattered a few drops of ink, plus added a few random scribbles and crosses using a pencil.

That's all from me today, thanks for stopping by so I could share this with you. I will be back again soon with another project.
Until then, happy scrapping!

Saturday 16 June 2018

Project Life with Adele

Hey scrappy peeps!

Today I am catching up on some Project Life using the "Happily Ever After" collection. I thought it was rather appropriate to use this collection when documenting a fun weekend away with some of my scrappy besties...including a certain Flutterby gal!


I love to use the Everyday Etc cards to create my own cut out embellishment shapes, like this XO heart. I raised it on foam to give it some extra dimension and pair it with some enamel dots, a sticker from the sticker sheet and a label from my stash.


I created another pocket card here using two different Everyday Etc cards meshed together, along with some tiny alphas also available from the Flutterby Designs online store.


Do you enjoy using Flutterby goodies in your Project Life?? I am currently addicted to all the tiny word stickers available - I can't get enough of them!

Have a lovely scrappy weekend peeps!
Adele :)


Wednesday 13 June 2018

You're My Weirdo by Allara Bamforth

Hello,

Allara back on the blog today with another fun layout from the Happy Ever After Collection!

So this layout actually started as an extension of the previous layout from May 27th, You are the Stars. All the Flutter Colout Paint - Bright set that I had used on the previous layout, I  applied with a brayer. So after rolling each colour over the my previous page, I cleaned my brayer on the top of my next page - so as not to waste any paint and created a really cool looking distressed back ground down half of the page.


Using the I Heart You Stencil, I've applied some Artic While Flutter Colour Paint across the top of the page and then painted some Raspberry Punch down the side of the white hearts. I then added some stamping on the Raspberry Punch. Pulling out the I Heart You Stencil again I've added some hearts, this time with Black Mayhem Flutter Colour Paint. I've outline the the hears with some White and Black Paints Pens. Next I've dipped the end of paint brush into the Tropicana Teal Flutter Colour Paint to make some dots to create more interest and splattered some of the white paint over the back ground. Then using the All you Need is Love Stencil and my black marker I've added "Love" over the page.

I've then layered my photo with the Everyday Etc Filler Cards and from the 12 x 12 Paper Pack - Happily Ever After Collection and the What Makes us Work page, I have added one of the quotes. Finished it off with the Nuts About You Flair from the Happily Ever After Flair Buttons 2 Pack. And coloured a litle bit of hessian for some texture.

Thanks for taking a peek at my creation this time around and make sure you pick up some of these fabulous goodies through the Flutterbys Store.

Till next post,

Allara

Sunday 10 June 2018

'Happy Life Together' by Rachel Dutko

Hello everyone!

Rachel with you today with a 12x12 layout using the 'Happily Ever After' collection.


I used a piece of the 'Mac & Cheese' 12x12 paper for my base.
I then added some Flutter Colour Paint in Orange Goldfish and Tropicana Teal 
to create more layers in my background.


I then layered some Everyday Etc filler cards under my photo.


For my title I used a 'together' wood veneer piece which I coloured with Tropicana Teal Flutter Colour paint, 
as well as the 'Happy' and 'Life' fussy cut from an Everyday Etc. card.


I also added some stickers, a flair, some enamel dots and some more details fussy cut from Everyday Etc. cards.


Thanks for looking
Rachel x x


Thursday 7 June 2018

Love | Tamara Buckler

Hey Hey Flutterby Friends,

Tam back with you today to share my latest layout using our new 'Happily Ever After' collection. This one features a couple of pics of hubby and I, which are sadly few and far between. Something I need to rectify I think!


I started by running some texture paste through the 'all you need is love' stencil, which I laid diagonally across the page. I then watered down some Flutter Colour Paint in Orange Goldfish, and used the packaging technique to apply this to the page. I also added some paint and ink splatters at this point.

I then matted and layered up my photos with some Everyday Etc Filler Cards, and then tucked some Page Tabs around the place.


The large enamel 'love' is just gorgeous and really directed where the other elements on the page where going to be placed. I added in a sentiment from the Everyday Etc Cards.

I added in some fussy cut hearts from some older 'We Run the World' 12x12 paper pack, and I love the grungy edge this gives. And to finish off the page,  I added in some stickers and enamel dots.


Thanks for stopping by to check out my layout today, and I hope you all get a chance to get crafty over the weekend.

Big Loves,
Tam xo