Showing posts with label wood veneer. Show all posts

Friday, 26 July 2019

Embrace Today || Elisa Ablett

 Hi Everyone,

Happy Friyay!!! 😁😁

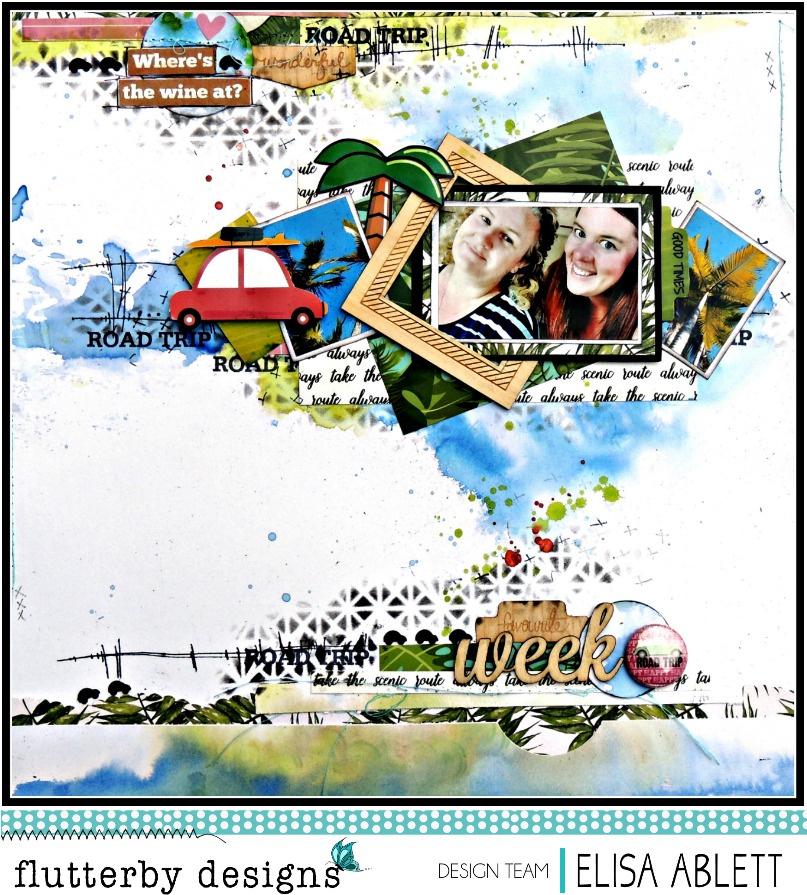
My turn up on the blog today with my latest layout featuring Art Foamies, I am in total love with these stamps, there are new designs available soon in the Flutterby Shop so don't miss out..

So while I was at the Flutterby Retreat last weekend and had the whole Flutterby shop to browse thru, I snagged a few (ok...a lot) of Flutterby goodies some really new and some older pieces. There is nothing like raiding your stash to go with your new goodies to make your layout work.

Let's take a look at some of the other products used to create this layout.


To balance the layout, I used teal accents in my layering under the photos and also layered underneath the fussy cut star. I left my wood veneer mostly raw except for a few stars which i painted black.


In keeping with my layout design I stamped my Art Foamies off the side of the yellow paper, 'Sunshine' from the Flawsome collection. This allowed for my title to go on the side as well, i think it draws the eye to the photos. 


Everyday Filler Cards for the win! great for layering and matching with your background and your accents. 

Add a few enamel dots to tie the whole thing together and a few accents in black.

Thanks for stopping by the blog today, 

Hugs 

Elisa x


Monday, 1 July 2019

Well S*&# Aye II Chrissi Mannix

Hello Lovelies,
So its been awhile since I've been in my art room, and my mojo is lacking a little. But this weekend was full of some big moments that I just HAD to journal about. I have, what I call a creative journal. Its a mix between a journal, an Art journal and a brain dump I say. it's my outlet.
and this weekend, my hot water tank, literally exploded on Friday night. Not so fun.
So this was def something to journal about, and if there was ever a time for the 
Sentence Enhancer Collection, well this was it.
I started with the Sentence enhancer stencil, and some modeling paste. I wanted a few choice words to stand out from my background. Then I used some coloured ink and water to add colour to my page. This makes the texture paste pop aswell.
I printed my pictures in a small size so I could add 2 to my page. I stapled them together and glued them to my page. I used some stickers from past sticker sheets below my photos to express a few phrases that were used during this moment lol.
I knew I wanted to highlight my "title', and the Sentence Enhancer wood veneer set had the perfect words for this page. The wood veneer is always alot thinner then usual, which means it didn't bulk up my page, and my journal. A reason I Adore the Flutterby Wood Veneer. I used some of my fave alpha stamps and archival ink to complete my heading.
So that's it from me for today, I hope you enjoyed the little look into my Creative Journal/brain dump as I lovingly refer to it, and I will be back soon with a new scrappy project.
Happy Scrapping 
Chrissi xxx

Wednesday, 19 June 2019

This Is Home | Rachel Dutko

Hi everyone!
Rachel back with you today with another layout to share.


To create the mixed media background for my page I started by adding 
some strips of the "Waves Of Wonder" 12x12 paper 
to some white cardstock with some gel medium.
I used a black pen to add detail to the circular lines of the paper.


I then added some flicks of Colour Blast Colour Artist Ink, 
and sponged on some Flutter Colour Paint in Orange Goldfish.

The next step was to add some stamping of dark blue acrylic paint 
with a "Round Random" Art Foamie stamp.


With the background done, I painted some 'days of the week' wood veneers with black gesso.

I then added some "We Are" Everyday Etc filler cards under my photo.


I fussy cut the house and the word 'home' from some "We Are" Everyday Etc cards
I cut the 'this is' from a "Happily Ever After" Everyday Etc card.


I've also added an arrow from Charm's Creations, a page tab and a Snippet Strip.


Thanks for looking
Rachel x x


Tuesday, 21 May 2019

Wild Adventure | Allara Bamforth

Good Morning!

I'm back on the blog again for May with a stash busting layout with a picture of my son taken about 7 years ago now. He has grown up so much.

On my background today I'vd used some Flutter Colour Paint in the shades of Sunshine Yellow, Tangerine Orange and Green Limousine and just smudged them around with my brayer. I've also added some water to the Green and splattered that over my back ground. Using the 'Macqueen' stencil, I blended some oxide inks in matching colours over the page. Next to these I've used my stitch stamps with the same colours for some interest.

My photo is matted with a variety of Everyday Etc Filler Cards from a couple of different collections including We Are and Happy Together. The page tab is also from the We Are collection. To finish off I've used the Star Stencil to draw in some random hearts and a few more stamps with black ink to tie some of the back together. The 'Wild' title was cut from the Wild Bohemian Everyday Etc cards, Adventure was one of the older Wood Veneers and the Stickers are from the current Magical AF Sticky Quotes.


And as some added interest - I found some black chipboard leaves to tuck in behind my photos.


Thanks again for taking a peek this week.

Till next post,


Friday, 1 February 2019

Be Bold, Be Awesome, Be Brave | Tamara Buckler

Helllooo Peeps,

I'm up again to share with you another fun layout featuring the 'We Are' collection, as well as some other awesome bits and pieces. This one is nice and bright, with a heap of impact, seems to be how I roll at the moment!


I have used the 'I'll keep you' paper from the 12x12 paper pack as my background, and have added some white gesso to the centre of the page to soften what is a very bright and busy pattern. This allowed me somewhere to work with my mixed media, and other elements.


I created some very bold paint stripes using Black Mayhem Flutter Colour Paint and a dry brush. I then added some texture by using the Little Big Love stencil and some texture paste, and by adding some plasterers tape.


I layered up my photos using some Everyday Etc Cards from the 'We Are' Collection. I tucked both my photos into a Photo Cut Out, this helped to ground my photos and I was able to work this into my title.

I used some wood veneer words from my stash, and painted them with the black Flutter Colour Paint, to complete my title.


I finished off the page by adding in some Flutterby Flair Buttons, various stickers, and enamel dots.

Thanks for stopping by again today, and I hope you feel inspired to create something using the amazing 'We Are' collection!

Big Loves,
Tam xo


Wednesday, 30 January 2019

Kick A$# My Boy-Chrissi Mannix

Hi Lovelies, Chrissi back today sharing a Project Life insert from my 2018 album.
The thing I love most about the Flutterby Designs Collections, is the attitude. I love how Anita infuses this kick ass attitude with such awesome designs, and that attitude is just perfect for this awesome experience we had last year.
As I was going through the Xtreme Teen Every Day Etc cards, I was seeing some awesome quotes and icons that were perfect for my sons District Cross Country insert I was doing in my project life album.
 In 2018, my son had an amazing experience in school sports and athletics due to the Athletes with Disabilities program, meaning he competed against other athletes with similar challenges as himself, instead of other boys his own age, that he cant quite keep up with. So this meant, for the first time, he actually went through to the district carnival. Which was such a big thing for him. It was an amazing experience. 
This card here, from the Every Day Etc cards was my favorite and probably the reason I chose this collection for this spread lol. It sums it up pretty perfectly. 

Honestly, usually I'm not a frame person. I tend to struggle with them, but this one from the Photo Cut Outs sheet was too perfect to use on this photo. It highlights my boy and works with all the open space I have in the photo. I was happy to be able to use one lol. The veneer from the wood veneer bits pack was just perfect to embellish  my layout. I love the raw wood, and how it works, especially when working with 'boy' layouts.

I love how this Project Life Insert came together, and how perfect this collection was for it. I hope you enjoyed my project, and cant wait to share some new projects with you real soon. 
Chrissi xxx


Friday, 25 January 2019

Cool as Bro || Elisa Ablett


Hi Flutterby Fans,

Elisa here from the design team with my latest project for Flutterby Designs, a mixed media boy layout featuring a monochromatic palette plus the colour teal! 

Who else is a teal fan?

With this layout I started with spraying teal colour through the Star Stencil, letting that dry completely before adding black ink elements by smoothing black ink through the He Said She Said Stencil and the Got Letters stencil.

Then adding some funky distressed stamping with Viva Las Vegas Stamps.

Though I think the winner in my eyes is the monochromatic everyday filler cards of the 'Blank Pallete' collection. Perfect to match with any colour/s and looks fab with wood veneer (speech bubbles).

Here are the close ups !


Thanks for stopping by the blog today,

Make sure you pop on by the Inspiration page to say hi!

Elisa x


Thursday, 17 January 2019

We Are Family | Tamara Buckler

Hey Hey Flutterby Friends,

Tamara back today sharing another super fun layout using the 'We Are' collection - this collection is proving to be soooo versatile and just keeps giving and giving.


I am so in love with this layout, it is so bold and has such high contrast between the 'Organised Chaos' 12x12 paper and the rainbow elements around the page. I cut the word FAMILY out of the background paper using my Silhouette, trying to match the font to one that pops up in the Everyday Etc Cards. I backed FAMILY with various Everyday Etc Cards, creating a reverse rainbow with the colours.


I backed my photo with more of the Everyday Etc Cards, and a frame that I fussy cut. I adhered this directly to the background, as I have popped up the 'We Are' part of the title to give some definition.


I have added in a lot of bits and bobs from this collection, as well as some wood veneer, flair buttons,  snippet strips, and enamel dots. This keeps the rainbow feeling going across the whole page, again working on that contrast and interest.


I even cut out some of the little preview images from the cover sheet in the Everyday Etc Cards. Why have I not thought of this before?!?! It gives you a heap of mini cards to play with! So cute!


I finished off the page with some ink splatters and some squiggly lines around my title.

I seriously love how this page has turned out! I'm on such a role with my layouts at the moment, I've even got my next share ready - love it when a collection just sets your mojo on fire!

Thanks for stopping by!

Big Loves,
Tam xo


Friday, 11 January 2019

Road Trip | Elisa Ablett

Hi Flutterby Fans,

Elisa here from the new look Design Team with my first post ! 

I have been super excited to start creating with all the bright and funky Flutterby goodies and came across some 'road trip' products and I immediately thought of the layout I would create.

My layout features the 'Good Vibes Only' collection plus loads of other Flutterby products.


Let's take a closer look at the finer details 😀


I started with a background created with Distress stains, stamping with Viva Las Vegas Stamps and blending ink through Flutterby Designs 'bright-like-a-diamond-stencil'.

I also fussy cut some elements from the 'Good-vibes-only-everyday cards' to build a scene along with some layered 'good-vibes-only-filler-cards' and 'wood-veneer' bits and pieces.


Add some distressed sewing (ahem... ok terrible sewing) and a cute little flair-button, some wood veneers and a few splatters here and there! 

I also like to get some use out of my old circle punches.


Layer your elements so they flow across your page over the background you have created.

Make use of your stored up snippet-strips - neutral colours to add that extra layer over your elements.


Don't be afraid to try your photo and elements on an angle, I cut a photo in two (palm trees and sky) and added that to my photo cluster to continue with telling my story on the page and then decided to give them all a little twist to add visual interest. 
Play around with your design before you stick it down!


 That's it from me today, thanks for stopping by the blog and 
sharing my excitement for my first post as part of the team!  

Wishing you all a Happy New Year as well, let's all do some fabulous things in 2019 !

Hugs 

Elisa x