Showing posts with label stencil. Show all posts

Sunday, 10 March 2019

Cute AF- Chrissi M

Hello Lovelies
Chrissi here, back with another layout using the fabulous Magical AF Collection.
I had alot of fun with this layout. I wanted to show you how I have used the same collection to make a cute layout of my little niece, as well as using a pic of hubby and myself.
I started with some blue mist for my background, to make those blues in the collection pop.
I love this paper from the Magical AF paper Pack. I decided to try something different, and rip it diagonally and adhere  a piece to the top and bottom of my layout to give it some added interest.
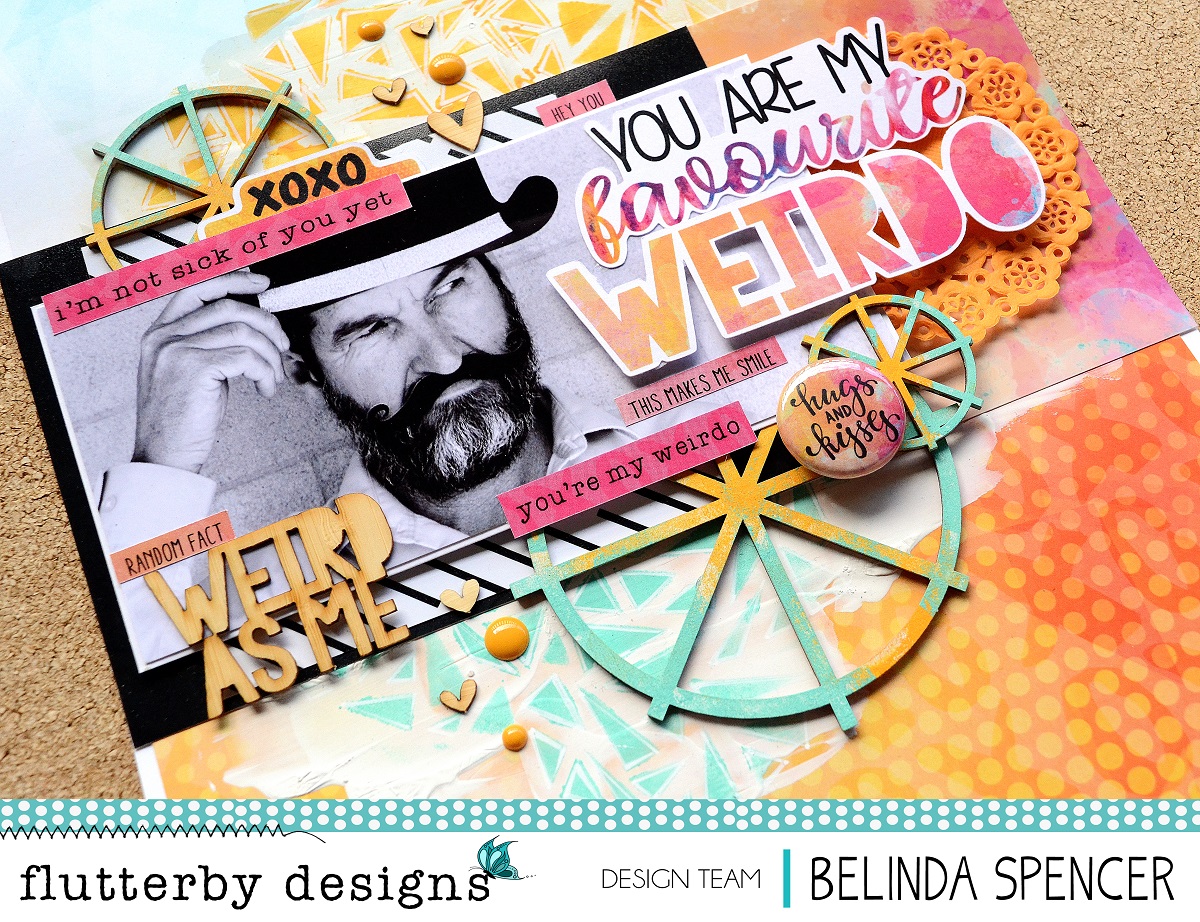
I've said it before, I LOVE using the Every Day Etc Cards as titles and embellishments. They are just full of awesome quotes and funky images. I was obsessed with this one that originally said "I think you are Magical AF". I wanted to use it, but the magical didn't quite fit. So I cut the card up, and decided to add to my title using the Got Letters stencil.
Using more of those Every Day Etc Cards and the awesome page tabs to layer behind my photo. Love using these together to build up layers.
The Magical AF Collection is available in the store right now, check it out. The DT are having a ball with it. 

tthats ot from me for now, Stick around for more inspiring projects soon.
Chrissi xxx

Friday, 23 November 2018

This is Love | Tamara Buckler

Hey Hey Flutterby peeps,

I'm up today sharing with you my first layout using the new 'We are' collection. I just love love love this collection! The colours are so bright and bold, and the phrases and stickers are so applicable to family life.


I started this layout by selecting the 'Messy Memories' 12x12 Paper Pack, this purple just sang to me as I was working on some photos of my girls checking out the gorgeous Jacaranda trees in Grafton recently. I smeared some gesso in a cross shape to the left of the page, and then used the 'xo' stencil to draw on the background.


I layered up lots of the Everyday Etc Cards behind my photo pulling in lots of the bright colours from the collection. I tucked in one of the frames from the 'Frame 52' cut apart sheet, because this really worked in with the amazing title piece from the Die Cut Title set.


The Die Cut title set is new in this collection, and I love how versatile the set is - you can change in the background piece and the die cut piece to create multiple title combinations. It is so easy to fussy cut the background piece, but you can leave it and just add the die cut piece over the top.


I used lots of pieces from the Die Cut Bits & Bobs pack to embellish the page, and another piece from the 'Frame 52' cut apart sheet.


One of the great things about the Flutterby products is that the collections all work in together, the flair button I have added to the page is an older design from the '403' Flair Button set, and it works pefectly!


Thanks for stopping by today to check out my page, and make sure you jump over to the shop and grab what you want from this range, because it is selling out fast!

See you next time!

Big Loves,
Tam xo


Saturday, 13 October 2018

Peace Love Pineapples | Sue Plumb


Hi everyone!
I am here today to share my latest design team project created for Flutterby Designs - a mixed media layout featuring the 'Good Vibes Only' collection and Flutter Colour paints. I documented a photo of myself, my hubby and a couple of our mates that was taken at a local event on Australia Day. (In case you are wondering how the pineapples are relevant, the event featured a pineapple throwing competition.)


To go along with the theme of Australia Day, I chose a green and gold colour scheme. I used Flutter Colour paints to paint my background - first using a brush, then a brayer, and finally my fingers to add some highlights. 


On top of the paint I added some Colour Blast Colour Paste using the super cute 'Be a Pineapple' stencil. I then dropped some green Colour Blast Colour Artist Ink randomly over the top before drying it off. 


Next I took some of the 'Good Vibes Only' Everyday Etc cards and created a layered mat for my photo; then added some frayed gauze for texture before adding my photo on top. I tore up some small pieces of washi tape from the 'Good Vibes Only' kit and placed them around the page.

I fussy cut my peace love pineapples title piece from another of the Everyday Etc cards, overlapping the corner of photo with it, and popping some foam tape under the corner to help keep it up off the page. I then added the hello there flair button from set #286 on top.


I added some stickers from the 'Good Vibes Only' Sticky Quotes sheet around my photo as well as some wood veneer pieces. I also added the good vibes only wood veneer further down my page. I decided my page needed a little more black so I added a few black Tiny Sticky Quotes to the page.


To finish off, I added some enamel dots; my handwritten journalling; a few stamped phrases; and some splatters of black ink.

I am super excited to add that I actually made my FIRST EVER process video for this page. I would love for you to pop over and check it out...


Thanks for stopping by today so I could share this with you.
Until next time, happy scrapping!

Thursday, 4 October 2018

Beautiful You | Belinda Spencer

Hey Flutterby peeps!!

Belinda here today to share  my latest layout featuring a sweet mix of slightly less recent Flutterby products that I have been hoarding in my stash.

'Beautiful You'


I have gone for a minimalist look on this layout with very little mixed media. Just to show that it is ok to keep it clean sometimes. 


I used the Shine Bright Like A Diamond Stencil along with a black journalling pen on my background.  I diluted the Green Limousine and Tropicana Teal Flutter Colour Paints with water and flicked some droplets over the background. I tore a strip from a Blank Palette Everyday Etc Filler Card with the same pattern as the stencil and slipped that into my stack of chopped up filler cards.


I used some filler cards from the Mixed Lines set which I cropped to size to sit behind my tiny photo. You can find these cards in the store HERE and the good news is that they are currently on sale. Winning!


I slipped a stencil word in to the right of my photo and slightly underneath it to hide the staples that I secured it with.


I have also used a Super Cool Page Tab, some stars fussy cut from the Stars Photo Cut Out sheet, the Frame 8 Photo Cut Out, words cut from the Cool Snippet Strips, Green Sticky Alphas and Neon Enamel Dots.


Well that's all from me today. I hope you are feeling inspired to keep it clean on your own layout and try a minimalist look. 
Thanks for stopping by the blog today.

Cheers
Belinda


Saturday, 1 September 2018

I Like You | Sue Plumb


Hi everyone!
Sue Plumb here with my latest design team project for you. Today I have a mixed media layout to share featuring Flutter Colour Paints, a NEW Flutterby stencil and lots of bits and pieces from my Flutterby stash.


I started my page with my photo, which was taken at the Flutterby Designs 'Create by the Lake' retreat last year. (I actually can't believe I hadn't done this one yet!) It features four members of the 2017 design team, along with our boss lady Neet, and was taken at the end of some paint throwing fun.

Inspired by the paint splattered board in the photo, I pulled out my Flutter Colour paints and painted an abstract background. The colours I used were Fire Engine Red; Yellow Zest; Orange Goldfish and Tropicana Teal. (I also used a tiny splash of a Dina Wakley navy paint.)


I then took the new 'Arty Farty' stencil; Staz On black ink and a sponge dauber and applied the words from the stencil around my page. (I used washi tape to mask off sections of the stencil as I moved it around.)
I also added a few torn strips of one of the 'Happily Ever After' filler cards.


Once my background was complete, I cut a piece from the 'Blanket Thief' 12x12" paper from the 'Happily Ever After' collection; and used it as a mat under my photo. I also cut some smaller strips of the same paper which I placed between some of the stencilled words on my page.

On the corner of my photo I stapled a tab from the 'Partners in Crime' page tabs sheet. I also added a white Tiny Sticky Quote; and behind the photo I tucked a cute little guinea pig sticker from the 'Furever Friends' Sticky Quote sheet. 


I figured this was a good chance to use up a few random bits from my stash, so I added the converse sneaker from the 'Xtreme Teen' Die Cut Bits & Bobs pack alongside my photo. My title, which I applied directly onto my photo, was cut from one of the 'Partners in Crime' Everyday Etc cards. (This is an awesome range for pages celebrating friendship.)


I took the opportunity to use some more stickers from the 'Furever Friends' Sticky Quote sheet, using the title and some of the word / quote stickers around my page. I also added some Bold Enamel Dots and Rainbow Heart stickers.


Alongside my photo on the left, I added a large ampersand cut from one of the 'Any Direction' Everyday Etc cards; a "rad" sticker from the 'Xtreme Teen' Sticky Quotes sheet; and the 'You Inspire Me' flair button (from set #417).

That's all from me today. Make sure you head over to the Flutterby Designs store HERE to check out all the new goodies in store. There are new stencils and page kits that have been listed, so pop over and snap them up before they are all gone.
Until next time, happy scrapping! 


Thursday, 5 July 2018

Weirdo | Belinda Spencer

Hi Flutterby peeps!!

Belinda here with you today to share a layout I have created featuring the fabulous Happily Ever After collection.

'Weirdo'


I think the 12 x 12 patterned papers in this collection would have to be my favourite yet. I just love the vibrant colours making them the perfect base for a layout. Here I have used the "I'll Keep You" paper. I swiped some white gesso over a central area. After the gesso was dry, I used the 'Fragmented' Stencil with Flutter Colour Paint in Orange Goldfish and Tropicana Teal. I flipped the colours to be the opposite of the patterned paper. Once the paint was dry, I placed the stencil over the top again and added fine white outlines using a white paint pen.


I also painted the 'Wheels' Wood Veneer to match starting with a white gesso coat followed by the same Flutter Colour paints.


I really love the mix of orange and pink in the title so I have used enamel dots and sticky quick quotes in these same colours.


I used the bold black love heart filler card behind my photo to match the bold blacks in my photo.


I do love to leave the wood veneer in its raw state too so I added the 'weird as me' quote just as it is along with a sweet sprinkling of hearts.


Products used:

Stencil 'Fragmented'
- Orange Goldfish
- Tropicana Teal


Thanks so much for stopping by the blog today to check out my layout. You can find the full collection over HERE in the STORE.


Monday, 18 June 2018

Blanket Thief | Sue Plumb


Hi everyone!
Sue Plumb here to share my latest design team project with you. Today I have a mixed media scrapbook page to share that I created using the new 'Happily Ever After' collection and some Flutter Colour paints. (And of course, my super cute kitty too!)


I started this page by creating an abstract background using Flutter Colour paints. The colours I used were Tropicana Teal; Grape Soda; Green Limousine; Stormy Grey and Yellow Zest. I didn't work with any particular result in mind when I applied the paint, I simply followed my instinct. I used a combination of methods to apply it - smeared with an old gift card; applied with a brush; and also with my fingers.


Once the paint had dried, I applied some black ink using a sponge dauber through the 'Hugs and Kisses' stencil. I then took some of the 'Happily Ever After' Everday Etc filler cards and applied some cut and torn pieces to my background, before mounting my photos on top.


I used two of the 'Happily Ever After' Everyday Etc cards and fussy cut the large LOVE word and also the blanket thief phrase. I then used 'Teal' Sticky Alphas to add the word couch to my page.


I then added the XOXO sticker from the 'Happily Ever After' Sticky Quotes sheet; along with the life is good and cheeky bugger phrases from some of the Snippet Strips.
The final embellishment I added was the good vibes only flair button directly onto my photo, from the 'Good Vibes Only' flair button set #1.


To finish my page, I splattered a few drops of ink, plus added a few random scribbles and crosses using a pencil.

That's all from me today, thanks for stopping by so I could share this with you. I will be back again soon with another project.
Until then, happy scrapping!