Thursday, 4 October 2018

Beautiful You | Belinda Spencer

Hey Flutterby peeps!!

Belinda here today to share  my latest layout featuring a sweet mix of slightly less recent Flutterby products that I have been hoarding in my stash.

'Beautiful You'


I have gone for a minimalist look on this layout with very little mixed media. Just to show that it is ok to keep it clean sometimes. 


I used the Shine Bright Like A Diamond Stencil along with a black journalling pen on my background.  I diluted the Green Limousine and Tropicana Teal Flutter Colour Paints with water and flicked some droplets over the background. I tore a strip from a Blank Palette Everyday Etc Filler Card with the same pattern as the stencil and slipped that into my stack of chopped up filler cards.


I used some filler cards from the Mixed Lines set which I cropped to size to sit behind my tiny photo. You can find these cards in the store HERE and the good news is that they are currently on sale. Winning!


I slipped a stencil word in to the right of my photo and slightly underneath it to hide the staples that I secured it with.


I have also used a Super Cool Page Tab, some stars fussy cut from the Stars Photo Cut Out sheet, the Frame 8 Photo Cut Out, words cut from the Cool Snippet Strips, Green Sticky Alphas and Neon Enamel Dots.


Well that's all from me today. I hope you are feeling inspired to keep it clean on your own layout and try a minimalist look. 
Thanks for stopping by the blog today.

Cheers
Belinda


Monday, 1 October 2018

This Is Us Documented | Sue Plumb


Howdy peeps!
Welcome to October and happy Monday! (If you are smack-bang in the middle of school holidays like we are here, you have probably lost track of what day it is by now.) I am here today to share my latest design team project - a fun mixed media scrapbook layout featuring the 'Happily Ever After' collection and a photo of my hubby and I.


I started my page by creating my background on a sheet of white cardstock. (I used Bazzill Marshmallow so that it could handle the wet media.) First, I applied some Colour Blast Colour Artist Inks - 'Cranberry', followed by 'Slipper'. I added some extra water to move them freely around the page and help them to blend. I then dried it off with a heat gun before going back and splattering clean water over the top with a brush to take out some colour; leaving it to sit for a minute before soaking it up with some paper towel.


I then added some Flutter Colour paints - a touch of Cotton Candy Pink, as well as Sunshine Yellow; which I spread randomly on top with a brayer. After that had dried, I went back with some Arctic White and brayered some (more heavily this time) to pull the colour right back where my photo was going to be placed.

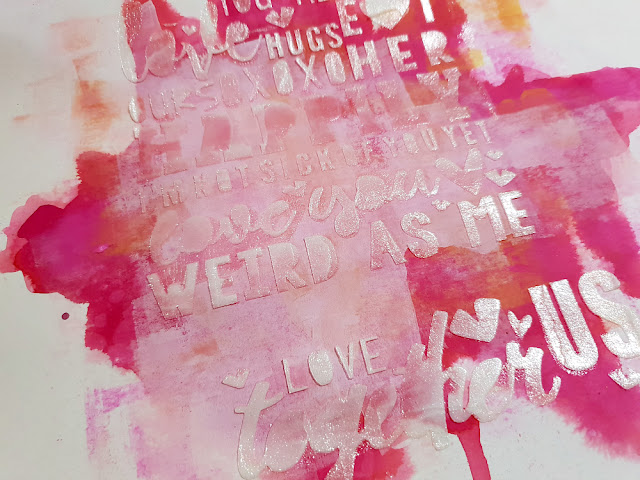
For the final layer in my background, I wanted to add some subtle detail and texture, so I used  the 'Happily Ever After' stencil with Colour Blast 'Snow White' Colour Paste before setting it aside to dry thoroughly. 
Look at the gorgeous shimmer...


With my background complete, it was time to add some papery layers on top. I used 'Happily Ever After' Everyday Etc filler cards, cut into various sized pieces to create a layered photo mat before adding my photo on top. I also tucked one of the coordinating 'Happily Ever After' page tabs in behind my photo and secured it with a staple.


I used some torn pieces of the lip printed washi tape from the 'Happily Ever After' Kit - placing my "kisses" randomly around my page. The title piece for my page - this is us documented was cut from one of the 'Happily Ever After' Everyday Etc cards.


I used a variety of heart stickers from the 'Happily Ever After' Sticky Quotes sheet scattered around the page. Also from the same sheet was the you+me=love sticker, which I popped up on some foam tape next to my photo, along with the for ever and ever banner. 


I love adding elements directly onto my photos. Here I added the together sticker in the corner of my photo, and then the you+me phrase sticker below it. (The Sticky Quote sheets always have a great variety of stickers to use, and they stretch a long way too!)
The final embellishment I added was the you are the bacon to my eggs flair button from the 'Happily Ever After' Flair Button Set 1


To finish my page I added a few small splatters of blue mist and I was done.
Thanks for stopping by today so I could share this with you. If you haven't seen the new A5 display folders or the stencils and page kits that were recently added to the Flutterby store, head over HERE to see whats new.
Til next time, happy scrapping! 


Saturday, 29 September 2018

Junk Journaling "You've Got This" | Adele Toomey

Hi arty peeps!!

Today I am playing in my junk journal using the We Run the World collection. While reminiscing on those final weeks of my pregnancy with Archie, I knew I had to use this collection to document the bravery needed for the new unknown!


I used Flutterby paints and heart stencil to create a background for my spread. 


I love the black and white heart paper so much, so I decided to cut some of them out as embellies. I also used a heart punch from my stash to punch out some shapes from the other beautiful papers in the colleciton. 


I hope you also enjoy the process video I created for this spread. Have a lovely week!
Adele :)


Wednesday, 26 September 2018

Dec 25 - Family Traditions by Allara Bamforth

Happy  Hump Day!,

Over the weekend when I was thinking about what to create for this post, I realised it was only 3 months (yes 3!) till Christmas. So I thought I would create something with the fabulous "Fair Dinkum Chrissy" Collection to help me cope with this looming event! Don't get me wrong, I love Christmas and gettting together with family but it always just comes around so quick and I'm almost never prepared!

For this layout I've picked some pinky coloured cardstock. I've been only using white lately to create mixed media background but thought it was time to delve back into the multitiudes of coloured cardstock I have laying around. Using the Halftone stencil with some transparent gel medium mixed with some Flutter Colour Paint - Fire Engine Red I positioned this through the middle of the page. Once it's dry I've flicked over some Flutter Colour paint in Artic White and down the sides added some gold glitter washi tape from my stash.

Next I've layered my photo of my family taken last Christmas with Everyday Etc and  Filler Cards from the Fair Dinkum Chrissy collection. Also cut strips of the Filler cards to frame each side of the photo piece.

The Family Traditions title was also cut out of the Everyday Etc cards.  A few tabs from the Fair Dinkum Chrissy Page Tabs were also added to the photo as well as some snippet strips. To finish off I've added a Flair Button 'Eat Lots and be Merry' and used my white paint pen to adde some highlights.

Till Next Post,

Allara x


Sunday, 23 September 2018

Unwind | Rachel Dutko

Hi everyone

Today I'm bringing some relaxing vibes for your Sunday morning.


I created my background by firstly applying some gloss gel medium though a 
Cool As A Cucumber stencil to create a resist, 
to which I then sprayed over some Prima Color Bloom spray ink.


I then used some Orange Goldfish Flutter Colour Paint through the same stencil 
onto some white cardstock, and fussy cut 
individual words to create some title words.


I created some layers under my photo by using 
from a mix of collections.


I created a cluster using some Good Vibes Only Sticky Quotes
flair buttons ( set No. 179 and set No. 143), 
a Tiny Kraft Sticky Quote sticker and a page tab
 

I added various page tabs, as well as some enamel dots.


I hope my layout has brought some calm and relaxation to your day.
I really wish I was back in the Whitsundays!!

Thanks for looking
Rachel x x


Friday, 21 September 2018

Swing like a... | Tamara Buckler


Hey Hey Friends,

I'm back today to share with you another vibrant mixed media layout featuring some awesome Flutterby papers and one hell of a title!!


The background for this layout was inspired by the 'Beyonce' paper in the We Run the World 12x12 paper collection. The triangles on this paper were screaming at me to be cut out, and I did that, but kept their arrangement on the page. The colours on the background were then drawn from this, and I used a mixture of FlutterColour paints and other mediums to make this happen. 


I then stitched over the triangles with my sewing machine using black thread, to add more texture, and distressed the edges of the triangles to do the same. 


I layered up my photo using various Everyday Etc Cards, some tissue paper, and some cardboard that I painted with Black Mayhem FlutterColour paint.


I tucked a Fussy Cut under the photo cluster, I am loving these at the moment! And added a Flair Button which I altered with some Tiny Sticky Quotes

To finish off the page, I cut out a saying from a Flawsome Everyday Etc Card, added in some extra alphas, and made a kick arse title!


I love the way this page turned out! My daughter is having a tough time at high school at the moment, so I feel like this is really speaking to the attitude we are working on developing! We need our girls to be kick ass in this crazy world!!

Thanks for stopping by today, 

Big Loves,
Tam xo


Wednesday, 19 September 2018

Vibes | Belinda Spencer

Hello Flutterby peeps!

Belinda here today to share a layout featuring the Good Vibes Only collection.

'Vibes'


I have used one of the fabulous 12 x 12 papers in this collection for the base of this layout. I am just loving that gorgeous pink! The good news is these papers are still available in the shop HERE. Be quick and grab them while they last!!


I swiped a little gesso over the background with a palette knife to form the central area where my photo and all of the bits and pieces would sit.


I chopped up some of the Everyday Etc Filler Cards in the range and added those before adding my photo with a little 3D foam. Keeping the foam just in the middle of the photo back allows me to then slip lots of cute die-cuts, page tabs and other elements around the sides.


I love the die-cut leaves and flamingo in this range as well as the cute stickers. I like to add the stickers to white cardstock first to strengthen them so that I can use them as embellishments.


I finished with some Tickets, fussy cut arrows from a filler card, an 'awesome' flair button and a fabulous acrylic word.


Here's what I used:

- Tickets 'Bright'