Showing posts with label neon. Show all posts

Tuesday, 3 July 2018

I Love You From My Head Tomatoes | Sue Plumb


Hi Flutterby peeps!
Sue Plumb here to share my latest design team project with you. Today I have a 12x12" scrapbook layout to share that features the recently released 'Happily Ever After' collection and a snap of one of my boys and I that was taken at a party last year. (This particular one isn't fond of selfies with mum, so the fact that I got this pic was quite an achievement! haha)


For my layout I really wanted to use the cute I love you from my head tomatoes quote so I built my page design from there. I fussy cut the cute tomato and quote from the Everyday Etc card; and then pulled the gorgeous bright mixed media style cards from the Filler card pack to form a mat for my photo. (The background paper is from Cocoa Vanilla Studio.)


On top of my photo mat, I added some strips of the XO washi tape from the May kit; then mounted my photo on some cardboard before adding it on top. I also added some cardboard to the back of the tomato and the quote, before adding them as well. 


Tucked in behind my photo I added one of the 'Happily Ever After' Page Tabs. Using this particular page tab meant I needed to add something else to bring in more green, so I used a coordinating filler card and a punch to add some circles to my page. (I also wanted to tie in the circular shape of the tomato.)


To the left of my photo I added the selfie wood veneer, which I coloured black with a Sharpie. Below that I added the appreciate the moment Snippet Strip and above it, the cool sticker from the 'Xtreme Teen' Sticky Quote sheet. 


Above my photo I added the asshole sticker from the 'Happily Ever After' Sticky Quote sheet (this sticker was perfect for this page, as being an asshole is one of this boy's specialties! hehe) I also added the you're my weirdo sticker from the same sheet at the bottom of my page.
To finish off my layout I added some Neon Enamel Dots and Rainbow Heart stickers; some splatters of black ink; and a few stamped phrases and date. 

That's all from me today. Thanks for stopping by so I could share this with you. I will be back again soon with another project. Until then, happy scrapping!


Tuesday, 18 July 2017

Absolutely F**king Gorgeous | Sue Plumb

Hi Flutterby peeps!
Sue Plumb here to share my latest design team project with you. Today I have a 12x12" mixed media layout using the brand new 'Flawsome' collection. This range is perfect for scrapping selfies, and what better selfie to scrap than a funny Snap Chat shot. As soon as I saw the colours in some of the cards in this collection, I immediately thought of this "drag queen" selfie I took recently...


I decided to use a black background to help the bright colours pop. I began by adding some 'Tropicana Teal' Flutter Colour paint to my cardstock using a short, flat brush and some randomly placed strokes. I then took some 'Arctic White' Flutter Colour paint and watered it down, before using another brush to splatter it across my background.


I then created a layered mat for my photo using several of the Everyday Etc cards from the collection and some messy cotton thread for texture. I also added one of the coordinating Page Tabs which I tucked in behind my photo; along with the BOLD wood veneer, which I layered with a Tiny Sticky Quote.


On the corner of my photo, I added the beautiful mole flair button, which I also layered with some more messy thread.


I fussy cut the absolutely fucking gorgeous words I used for my title from one of the Everyday Etc. I also added a few neon enamel dots to my page for some extra pops of colour.


To finish off, I added some small torn pieces to a couple of my page edges; the hello lovely Blackboard Sticky Quote; handwritten journal strips and a few staples. I am really happy with how this one came out and can't wait to create some more pages with this range!

Please note that the Flutterby Designs store is currently closed due to the Flutterby 'Create by the Lake' Retreat that kicks off this Thursday. The store will re-open on Monday 1st August.
For everyone who is coming along to this weekend's retreat - I will see you there!
Until next time, happy scrapping! 

Monday, 19 June 2017

Headphones In, Problems Out.... Skai Mitchell


Hey Flutterby Peeps,

Finally have my computer working so I can link up my layout I shared late last week.... I've been challenging myself to break away from my usual style of photo and embellishment clusters centrally located on the page, and this one was a fun one that almost looks like its sound exploding from the side of the page... Very happy with how this came together.... Ive absolutely LOVED creating with the Xtreme Teen range, and will be snapping up another kit before they all sell out... 


How cool is that paint splatter on the page!

I splattered down some Flutter Colour Paint quite thickly, and being impatient I used a heat gun to get it to dry.... Subsequently it bubbled and burst creating this cool effect!


Products used:


Thursday, 1 June 2017

#go | Sue Plumb

Hi everyone!
Sue Plumb here to share my latest design team project with you all. This page actually began as something else and then evolved into this. (Tell me I am not the only one whose projects take on a mind of their own?)
So, I began this page with a selfie, some pink Dylusions paint and my Flutterby stash and this is what I ended up with...


I actually went back and re-visited the 'No Excuses' collection for this page. I have been on a journey to lose weight and get healthier (inspired by the Flutterby boss lady herself), since October last year. It's important to remember to document your own stories, not just those of your kids or family members.


After my painted background was dry, I created a photo mat using a few 'No Excuses' filler cards, which I cut into various pieces and layered together. I also added in a paper doily from my stash and some messy cotton black cotton for texture.


This quote (cut from an Everyday Etc card), was the perfect partner for my photo and also serves as a good reminder to myself how much of this journey is a mental game.


I used the Blackboard Sticky Quotes to support my title. I love these stickers so much (there is also a different set available in white.)


Don't you love the page tab I tucked in behind my photo? It's from the coordinating 'No Excuses' sheet.


I also added one of the coordinating flair buttons (from set #408), which I layered on top of a Charms Creations star and some messy cotton thread.


To finish off my page I added a few neon enamel dots around my page, and some splatters of mist.

Thanks for stopping by so I could share this with you today. I will be back again in a couple of weeks with another project to share.
Until then, happy scrapping!

Monday, 3 April 2017

Nope Not a Dog + No Joke | Krisy Podolak

Hi Flutterby Lovelies,

It's Krisy back to share with you two more layouts using the "Fur-ever Friends" collection.  These two layout are actually about pets.  The first one is my mum's dog Pinto, who to this very day, isn't convinced my daughter is a person.  These photo were taken when she was almost a year old and she is four now.  Still, he always has to make sure both front and back, that she isn't a dog.  Yet he leaves the other two kids alone.  Weird, Right?


So, this layout is mainly about the background and I have used a whole heap of bits and pieces from the collection to embellish it.  There is flair, stickers, wood veneer and a fussy cut Everyday Etc Card.  This turned out pretty good in the end.  I wasn't sure about the whole direction when I started but all ended well.

 Here are a few close ups:


Now on to another dog layout.  This one is our beloved Bulldog, Bomber.  This photo was taken at one of my husbands regular house parties just before we met and I moved in 5 months later.  Bomber was the "Man" of the house.  He had his own couch, routine and an attitude.  I messed with that when I moved in and his attitude took a long time to adjust.

For this layout, I mimicked the cross pattern on the Everyday Etc card for my background and limited my colours to blue and purple.  Bonus that the couch is blue and the feature wall is purple. (Don't worry my husband is colour blind.  Each room had a feature wall and looked awesome to him and no one ever told him any different.) But luckily the colours worked well with the "Fur-ever Friends" cards.  I also added some photo tabs, die cuts, some stickers and enamel dots.  The new enamel dots in neon are freaking awesome.  I have just placed another order.  So if you haven't stocked up I suggest you do.

Here are a few close ups:

Thanks for stopping by today.

Krisy xx

Wednesday, 15 March 2017

Welcome to our Tribe.

Sometimes I still have to pinch myself when I see my photo alongside these awesome ladies!!!

Being chosen to be a Flutterby Designs design team member has been one the highlights of my year so far, only because I was a huge fan girl of the boss lady (Anita Rodway) before hand, and I had been following her work for a while..

This is probably my most favourite collection, WILD BOHEMIAN and one I've used over and over again. 


I've started on my Marshmallow cardstock and taped a sunburst stencil to it. Then I got messy with the Flutter Colour Paints. I've applied them to the cardstock straight from the bottle, and given them ample drying time before I have taken the stencil off.


Next, start your layers. Ive used bits from the WILD BOHEMIAN Everyday Etc Cards and the WILD BOHEMIAN Filler Cards, and machine stitched around the edges to give it some grungy texture. 

Add in some Enamel Dots in NEONWhite Sticky Quotes, a tiny Wheel wood veneer and a super cool flare (No.415) and you have one super rockin' page!


Wednesday, 1 February 2017

Purr-fect | Sue Plumb

Hi everyone! 
I am very excited to share this layout with you today, as it features the brand new 'Fur-ever Friends' collection and new release Flutter Colour paints! (These are scheduled for release into the Flutterby store this Sunday, 5th February at 8pm - you won't want to miss it!) This page also features my family's new kitten, Genghis.


I started this layout by creating my background using the new Flutter Colour paint set (the colours are so divine!) I used a few drops of the aqua paint in some water to create a watercolour paint, which I brushed over my cardstock using a wide brush. I then used one of the new release stencils along with some purple paint, and stippled some random bubbles onto my background. Finally, I added some splats of the new green paint over the top and left it all to dry.


Once my background was dry, I fussy cut my title from one of the Fur-ever Friends Everyday Etc cards and adhered it onto my photo. I then created a layered mat for my photo to sit on from the coordinating filler card pack. (I am not normally a purple person, but am so loving the colour combination here!)


Under my photo, I also added a frame (Frame 47 'Mad About You' Photo Cut Out), which I cut in half; a Fur-ever Friends page tab; and some messy cotton thread for texture. The tab on my photo came from the Fur-ever Friends die cut bits & bobs pack.


To add some extra dimension to my layout and to tie in with the circular theme I had going on, I also added some of my favourite wood veneer circles, which I painted with the new green paint. (How perfect is the colour match between the paint and the paper?!) Inside one of the circles I popped one of the Fur-ever Friends flair buttons (from the cat set).


Finally, it was time for me to put the finishing touches on my layout. I used the cute little paw print stickers and the meow sticker from the Fur-ever Friends Sticky Quotes sheet; some blue enamel dots (from the neon set); some stamping and black mist splatters.


I also added my handwritten journaling and a couple of white Tiny Sticky Quotes - there is no project that these stickers don't belong on! (PS - I hope you like the tongue-in-cheek way I used the meow sticker in my journaling.) ;)

So, mark it in on your calendars or set a reminder on your phone - the new release lines will go live in the Flutterby Designs store THIS SUNDAY at 8pm (that will be 7pm if you are here in Qld like me). If you have a pet (and not just dogs or cats), you are going to NEED this collection!

Til next time, happy scrapping! X

Thursday, 22 December 2016

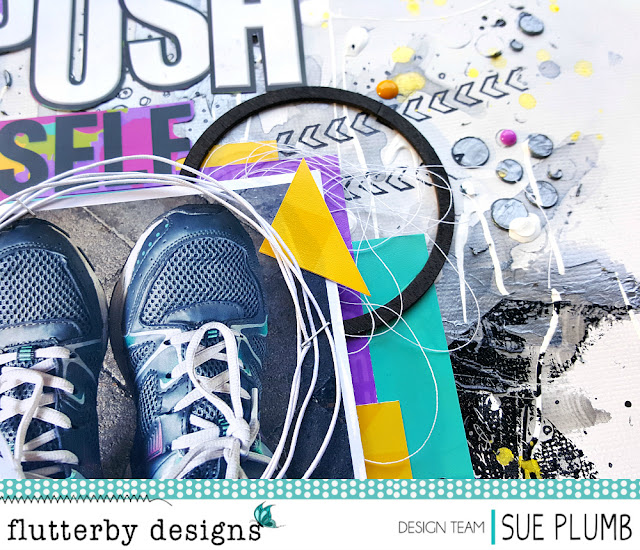
Push Yourself | Sue Plumb

Hi everyone! I hope this finds you all well and not too frantic in the final Christmas countdown. (With 3 young kids in our house, it's fairly safe to say the level of excitement here is currently sitting around DEFCON 2! haha)

Anyway, I am here today to share another of my Flutterby creations with you. Today's layout was inspired by my current journey of getting myself in better shape. After having spent so much of my time and energy looking after everyone around me in recent years, I was coming a very poor last. So I have changed my eating habits and am getting my lazy ass moving again. It's very true when they say that the hardest part is starting. But I am finding it is also difficult to maintain the momentum some days, especially doing it all on my own. I created this page so that I can display it to remind me to keep going every day.


After prepping my cardstock with gesso, I created a background using a combination of mists and stamps. I wanted to stick with neutral tones (much like my shoes pictured), that would allow some bright colours to pop from it. I added texture using some Colour Blast Colour Paste and one of my mini stencils, then flicked some white Flutter Colour paint over the top.


I used the No Excuses collection for this layout. The Everyday Etc card I chose to use for the push yourself title and the no one is going to do to it for you quote both really struck a chord with me as I tell myself this every day. I used some of the coordinating filler cards which I cut into pieces and layered together as a mat for my photo.


I highlighted my photo by adding a white cord frame on top of it, then used a few wood veneer circles (colored black) to help echo the circular theme. I also coloured the everyday wood veneer black to match.


Some messy cotton thread helped add some subtle texture; whilst the neon enamel dots added a few extra pops of coordinating colour and tied in with the other circular elements. A few well chosen white tiny sticky quotes placed around my page helped to reinforce my theme as well.


And what Flutterby creation of mine would be complete without a flair button? This be your own hero one, from set #410 which coordinates with the No Excuses range, was just perfect!


Thanks for stopping by today so I could share this with you. If you are making new year resolutions to get in shape, then make sure you put the No Excuses collection on your list to document your progress!

Finally, I would like to take this opportunity to wish you and your families a very merry Christmas and happy new year. I will be back again to share lots of my Flutterby creations in 2017.
Til then, happy scrapping! X

Monday, 10 October 2016

Be Bold | Sue Plumb

Hi Flutterby peeps!
Sue Plumb here with you to share my latest creation for Flutterby Designs. Today I have a 12x12" mixed media layout that features a photo of my cheeky boys showing me their "tattoos" that they had drawn on each other with textas.


I was inspired to create a messy mixed media background for this layout to fit with the "art" theme of my photo. I also wanted to draw in the paint splotch design from the Everyday Etc card (from the No Excuses range) that I chosen to use as the feature behind my photo.


To create my background, I used several different colours of Flutter Colour paint. I wanted the paint to splatter easily, so I watered it down slightly to make it thinner. Then I set about applying each colour by splattering and flicking it onto my page using a paint brush. In order to make sure I didn't make "mud", I dried each colour thoroughly before applying the next one. After it was dry I also added some stamping with black ink to give the background more depth and character.


As I already mentioned, I used an Everyday Etc card from the No Excuses range behind my photo. I also used another card from the same range to fussy cut my Be Bold title from. As there was no purple on my background, I wanted to add some purple elements to help tie in with colours in the title. So I used one of the coordinating No Excuses Filler Cards and cut it up to add the purple I needed.


Next, I added a flair button (from set #229), which I nested on some messy black cotton thread; and one of the Blackboard Sticky Quotes below my photo. I also added a couple of Snippet Strips around my page.


I then added a few Confetti Circles wood veneer pieces, which I coloured black with my trusty Posca pen and some neon enamel dots.


A few splatters of purple mist and some quick journaling and I was finished.

Thanks for stopping by so I could share this page with you. I will be back in a couple of weeks with another project to share. Until then, happy scrapping! X