Showing posts with label boy. Show all posts

Thursday, 9 November 2017

Happy Days | Belinda Spencer

Hi Flutterby Peeps!!

Belinda here today to share a monochromatic layout featuring the Blank Palette range.

'Happy Days' Layout


I love this photo of my darling son just chilling in front of the tv. He is such a sweet natured, funny and clever kid.

I used the 'Bright Like A Diamond' stencil and a black journalling pen to add some interest to my white background. Something a bit different to my usual backgrounds!


I have layered some of the photo cards under my photo and fussy cut the polaroid frame from a photo card also.

Did I mention that I LOVE fussy cutting? There are two types of crafters in this world I reckon; those that love fussy cutting and those that don't. I myself find it relaxing so I love finding titles and images to fussy cut from the photo cards as I have done here.


I added a scattering of the 'Circles' Wood Veneer and coloured them black using a black Posca Paint Pen.


I finished by adding a flair button and some Sticky Quick Quotes and a little bit of washi tape from my own stash.

Products used:
Wood Veneer 'Circles'

Have you tried a black and white layout before? It gives a pretty striking result don't you think?

I hope I have given you some inspiration to create your own monochromatic layout using fabulous Flutterby Designs products. Don't forget to share your awesome creations in the Flutterby Inspiration Group on Facebook so we can leave some love. 

Thanks for stopping by.

Cheers
Belinda


Wednesday, 25 October 2017

Today | Belinda Spencer

Hello Flutterby Designs peeps!!

Belinda here today to share a boy layout using a mix of different collections.

'Today' Layout


I am really loving creating in this A4 format now. My layouts just seem to come together quicker and easier. That could also be because of the awesome product from Flutterby of course!! So easy to play with.


Just for something different, I decided to use three tiny photos on my layout instead of the usual one only. I love these photos so much I couldn't just choose one! Anyway, the series of photos shows exactly what it is like trying to get a decent photo from this child of mine. LOL To be honest though these are the type of photos I love the most.


I have added a sweet scattering of enamel dots and wood veneer stars across my layout.


I fussy cut the title and this quote from the Everyday Etc 'Blank Palette' Photo Card Set. I layered some Filler Photo Cards from the 'Super Cool' Set under my photos.


I began my layout in my usual way. First I added texture using the Dangerously Dapper Stencil and Texture Paste. Once dry, I spritzed on quite a bit of water before squirting some of the Tropicana Teal Flutter Colour Paint. I spritzed a litle more water over the top of the paint and then used my fingertip to spread the paint and mix it with the water a bit more. I used a scrunched up paper towel to dab away the excess paint and liquid on the layout before leaving to dry.


I used a Charm's Creations Emoji Embellishment too. I jazzed it up a little using a die cut to add the hat, moustache and glasses. Too cute!

Well I hope you have been inspired by my layout today to create your own boy layout using fabulous Flutterby Designs products.

Make sure you pop back soon for more amazing inspiration from the Flutterby Design Team.

Cheers
Belinda


Wednesday, 17 May 2017

Beware of the Crazy Cat | Sue Plumb

Hi everyone! Sue Plumb here with you today to share my latest design team project. Today I have a 12x12" layout that is a bit of a different style for me. I used a combination of the new 'Xtreme Teen' collection along with the 'Fur-ever Friends' collection. I was obviously channeling a tabloid journalist on this day...


I used a sheet of black cardstock and a piece of newsprint patterned paper from Cocoa Vanilla Studio as the base for my page. I then used pieces cut from both the 'Xtreme Teen' and 'Fur-ever Friends' Everyday Etc cards to create the headline, quote and some of the subtitles.


My journaling on this layout consisted of the story, told in newspaper style;and I simple printed it to fit the columns on the patterned paper. The green quote stickers and danger sign are from the 'Xtreme Teen' Sticky Quick Quotes sheet, and I also included a black Snippet Strip.


I also used the green skull flair button from the 'Xtreme Teen' set # 1; and the "this week" and "family" tabs from the Photo Cut Outs 'Bright Directions Tab 3' sheet.


I am really happy with how this page turned out for something a bit different. (It's nice to mix things up sometimes isn't it?)
Thanks for stopping by today so I could share this with you. I will be back again in a couple of weeks with another project. Until then, happy scrapping!

Tuesday, 9 May 2017

I'm Not O-bleeping-kay & Epic Swagger | Belinda Spencer

Hello Flutterby peeps!!

Belinda here today to share two layouts featuring the brand new freaking awesome Xtreme Teen collection.


I love this brilliant collection so much that as soon as I had it in my inky, painty hands I whipped up 5 layouts! It's that good.

Now while I am not currently blessed with teenagers in my house, in no more than a blink of the eyes I will be. With a son that will be turning 11 this year and a daughter turning 12, the attitude levels are on the increase! LOL

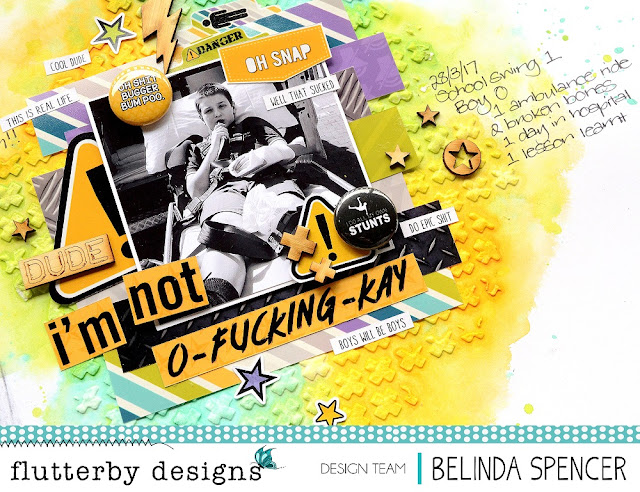
'I'm Not O-fucking-kay' Layout


So I recently got one of THOSE phone calls from the school. One young son in excrutiating pain after falling off the swing at school. He had the whole banana arm thing happening so off to hospital we went in an ambulance. He was such a trooper. Not crying or making a fuss. Totally calm throughout the whole ordeal and the very long wait at the hospital. So proud of him. :-)


Here's a peek at my background before I started layering on all of the fabulous embellishments and photo cards in the range. I turned the 'On The Plus Side' Stencil on it's side to create crosses (because I wanted to put a big fat cross through the whole day!). I swiped some Golden Light Molding Paste over the stencil and allowed to dry. Then I diluted some awesome Flutter Colour Paint with water, spritzed my background liberally with water and applied the paints with a soft paintbrush. I spritzed with water a bit more to get that paint really flowing and then dried off with a heat gun. It created a really lovely watercolour effect but still maintained the big, bold, brightness of the paints.


I love how absolutely perfect the embellishments and quotes are for the not so happy experiences! 


Here's what I used:
XTREME TEEN:
- Everyday Etc Photo Cards
- Everyday Etc Filler Photo Cards
- Page Tabs
- Wood Veneer
- Sticky Quick Quotes
- Die Cut Bits & Bobs

- Flair Buttons
- 'On The Plus Side' Stencil
- Sticky Quick Quotes
- Bright Tabs 2 Photo Cut Outs

FLUTTER COLOUR:
- Green Limousine
- Orange Goldfish
- Tropicana Teal


Next up is a layout featuring my daughter clowning around for a photo and giving me some teenage swagger!

'Epic Swagger' Layout


I started this layout by swiping some Flutter Colour Paint in Tropicana Teal over my background white cardstock. I also added some drippy Arctic White paint. Once dry, I stencilled on some stars using the Stargazed Mini Stencil and some Golden Light Molding Paste.


I have added a little stamping and then layered on co-ordinating filler photo cards, my photo and embellishments.


Here's what I used:

XTREME TEEN:
- Everyday Etc Photo Cards
- Everyday Etc Filler Photo Cards
- Page Tabs
- Wood Veneer
- Sticky Quick Quotes
- Flair Button

- Wood Veneer Page tab
- Stargazed Mini Stencil

FLUTTER COLOUR Arctic White

I hope you like my projects today and you are feeling inspired to get creative with your Flutterby stash too. You can find all the product I have used over HERE on the website.

Thanks for stopping by.

Cheers
Belinda

Monday, 17 April 2017

Turtely Awesome Dude and #4 | Sue Plumb

Hi everyone! It's Sue here today sharing my latest Flutterby projects with you. Today I have a bit of a bonus - a 12x12" mixed media layout AND a pocket page spread. (So bear with me as there are quite a few photos!)

Both these projects were created to document some of my boys' 4th birthday celebrations and I used the same basic colour scheme across each of them to help tie them together. As my boys are both Ninja Turtle crazy, I used lots of the 'Fur-ever Friends' collection, along with various other Flutterby bits and pieces.

First, here is my mixed media layout...


I started by creating a background using some Flutter Colour Paint from the Bright Set (Green Limousine, which I brushed on; then Tropicana Teal drizzled over the top). Once dry, I added stamping, then used the 'Stargazed' stencil and some Colour Blast Colour Paste to add texture over the top; and splattered some navy mist around.


After all my background work was completely dry, I used a couple of Everyday Etc filler cards to create some layers behind my photo to help it pop, along with some messy cotton thread tucked into my layers. I used the Turtely Awesome sticker from the Fur-ever Friends Sticky Quotes to form part of my title, along with the word dude which I cut from one of the cards from the older boy release - Super Cool.


To finish off my page I added some small stars wood veneers, (which I coloured black); a flair button (from set #403); and a white tiny sticky quote which I popped below my title. Then I stamped the date and added my handwritten journaling and it was done.


And now onto my pocket page spread. Here is a look at both pages together...


As you can see, I kept the overall design relatively simple which allowed the photos to stay the focal point; and maintained uniformity across the spread by using lime green as my primary colour, with accents of aqua and black.

Left side...


Right side...


I created my title card using one of the 'Fur-ever Friends' Everyday Etc filler cards. I added a banner which was cut from another card, along with a Snippet Strip (attached with staples); a Blackboard Sticky Quote (which I altered to suit my purpose) and my strip journaling.


I used a few more Snippet Strips around my page; along with the Turtely Awesome card; and some small wood veneer stars that I coloured black.


On the facing page, I used more wood veneer stars; enamel dots; and a flair button (from the 'Mad About You' set #2) as embellishments.


I made a tweak to one of the quotes from the Mad About You collection, adding the word "twins" to suit my purpose.


That's all from me today. I will be back again next month with more Flutterby projects to share.
Until then, happy scrapping! X