Saturday 29 September 2018

Junk Journaling "You've Got This" | Adele Toomey

Hi arty peeps!!

Today I am playing in my junk journal using the We Run the World collection. While reminiscing on those final weeks of my pregnancy with Archie, I knew I had to use this collection to document the bravery needed for the new unknown!


I used Flutterby paints and heart stencil to create a background for my spread. 


I love the black and white heart paper so much, so I decided to cut some of them out as embellies. I also used a heart punch from my stash to punch out some shapes from the other beautiful papers in the colleciton. 


I hope you also enjoy the process video I created for this spread. Have a lovely week!
Adele :)


Wednesday 26 September 2018

Dec 25 - Family Traditions by Allara Bamforth

Happy  Hump Day!,

Over the weekend when I was thinking about what to create for this post, I realised it was only 3 months (yes 3!) till Christmas. So I thought I would create something with the fabulous "Fair Dinkum Chrissy" Collection to help me cope with this looming event! Don't get me wrong, I love Christmas and gettting together with family but it always just comes around so quick and I'm almost never prepared!

For this layout I've picked some pinky coloured cardstock. I've been only using white lately to create mixed media background but thought it was time to delve back into the multitiudes of coloured cardstock I have laying around. Using the Halftone stencil with some transparent gel medium mixed with some Flutter Colour Paint - Fire Engine Red I positioned this through the middle of the page. Once it's dry I've flicked over some Flutter Colour paint in Artic White and down the sides added some gold glitter washi tape from my stash.

Next I've layered my photo of my family taken last Christmas with Everyday Etc and  Filler Cards from the Fair Dinkum Chrissy collection. Also cut strips of the Filler cards to frame each side of the photo piece.

The Family Traditions title was also cut out of the Everyday Etc cards.  A few tabs from the Fair Dinkum Chrissy Page Tabs were also added to the photo as well as some snippet strips. To finish off I've added a Flair Button 'Eat Lots and be Merry' and used my white paint pen to adde some highlights.

Till Next Post,

Allara x


Sunday 23 September 2018

Unwind | Rachel Dutko

Hi everyone

Today I'm bringing some relaxing vibes for your Sunday morning.


I created my background by firstly applying some gloss gel medium though a 
Cool As A Cucumber stencil to create a resist, 
to which I then sprayed over some Prima Color Bloom spray ink.


I then used some Orange Goldfish Flutter Colour Paint through the same stencil 
onto some white cardstock, and fussy cut 
individual words to create some title words.


I created some layers under my photo by using 
from a mix of collections.


I created a cluster using some Good Vibes Only Sticky Quotes
flair buttons ( set No. 179 and set No. 143), 
a Tiny Kraft Sticky Quote sticker and a page tab
 

I added various page tabs, as well as some enamel dots.


I hope my layout has brought some calm and relaxation to your day.
I really wish I was back in the Whitsundays!!

Thanks for looking
Rachel x x


Friday 21 September 2018

Swing like a... | Tamara Buckler


Hey Hey Friends,

I'm back today to share with you another vibrant mixed media layout featuring some awesome Flutterby papers and one hell of a title!!


The background for this layout was inspired by the 'Beyonce' paper in the We Run the World 12x12 paper collection. The triangles on this paper were screaming at me to be cut out, and I did that, but kept their arrangement on the page. The colours on the background were then drawn from this, and I used a mixture of FlutterColour paints and other mediums to make this happen. 


I then stitched over the triangles with my sewing machine using black thread, to add more texture, and distressed the edges of the triangles to do the same. 


I layered up my photo using various Everyday Etc Cards, some tissue paper, and some cardboard that I painted with Black Mayhem FlutterColour paint.


I tucked a Fussy Cut under the photo cluster, I am loving these at the moment! And added a Flair Button which I altered with some Tiny Sticky Quotes

To finish off the page, I cut out a saying from a Flawsome Everyday Etc Card, added in some extra alphas, and made a kick arse title!


I love the way this page turned out! My daughter is having a tough time at high school at the moment, so I feel like this is really speaking to the attitude we are working on developing! We need our girls to be kick ass in this crazy world!!

Thanks for stopping by today, 

Big Loves,
Tam xo


Wednesday 19 September 2018

Vibes | Belinda Spencer

Hello Flutterby peeps!

Belinda here today to share a layout featuring the Good Vibes Only collection.

'Vibes'


I have used one of the fabulous 12 x 12 papers in this collection for the base of this layout. I am just loving that gorgeous pink! The good news is these papers are still available in the shop HERE. Be quick and grab them while they last!!


I swiped a little gesso over the background with a palette knife to form the central area where my photo and all of the bits and pieces would sit.


I chopped up some of the Everyday Etc Filler Cards in the range and added those before adding my photo with a little 3D foam. Keeping the foam just in the middle of the photo back allows me to then slip lots of cute die-cuts, page tabs and other elements around the sides.


I love the die-cut leaves and flamingo in this range as well as the cute stickers. I like to add the stickers to white cardstock first to strengthen them so that I can use them as embellishments.


I finished with some Tickets, fussy cut arrows from a filler card, an 'awesome' flair button and a fabulous acrylic word.


Here's what I used:

- Tickets 'Bright'


Monday 17 September 2018

Purr-fect Arsehole | Sue Plumb


Hi everyone!
Sue Plumb here with my latest design team project for you. Today I am sharing an 8.5x11" mixed media scrapbook page featuring some photos of my cat when he was still a kitten. I had been wanting to document this series of snaps for a while and I knew exactly which quote I was going to use!


I began my layout with white cardstock, adding some purple watercolour paint along the top portion of the page and then holding it vertically and letting it run down. I then layered over it with some Flutter Colour paints. First 'Grape Soda', applied roughly over the top of some of the watercolour paint, and also in the bottom right corner of the page. Next, I added some 'Stormy Grey', which I spread around using a brayer.


Next, it was time for some texture and contrast. I used the 'Macaroon 5' stencil and Colour Blast 'Singin' the Blues' Colour Paste and applied it in three small areas of my page before drying with a heat gun. At this point I decided I wanted to strip back a bit of colour so I grabbed my 'Arctic White' paint and spread a little around with my brayer in my focal area. I then rubbed off the excess paint randomly around the page.


I then created a layered mat for my photo strip, using some Everyday Etc filler cards and a page tab from the 'One of Those Days' sheet, which I secured with small staples. Once I had all the layers in place I added my photos on top, mounting them up on some cardboard to pop them up a bit. Then it was time for my feature quote, which I fussy cut from one of the 'Fur-ever Friends' Everyday Etc cards and then placed above and below my photos.


At the top of my page I added the what the fuck? Snippet Strip, and you have got to be kidding black Tiny Sticky Quote.
Next, I created my title, which I placed in the bottom right corner of my page. I started by adding the word arsehole using the 'Sentence Enhancers' stencil, a sponge dauber and ink. I then added the purr-fect die cut from the 'Fur-ever Friends' Die Cut Bits & Bobs pack. Above that, I added the one of a kind Snippet Strip, and the hey you black Tiny Sticky Quote.


Alongside my title, I added the cat is in charge sticker from the 'Fur-ever Friends' Sticky Quote sheet. Then it was time for some finishing touches. I used one of my favourite stamps to add some random dots and spots around my page. I also used my Stabilo All pencil to add some page borders and scribbled details around my page. Finally, I added some splatters of aqua mist, stamped the date, and I was done!
Thanks for stopping by today so I could share this with you.
Until next time, happy scrapping! 


Saturday 15 September 2018

"Sweet Dreams" | Adele

Hi scrappy peeps!

I have been LOVING the We Run The World collection lately and have been on a real binge of using the gorgeous floaty watercolour details on my pages.


I used white texture paste in the background with a Flutterby Designs small circle stencil. This helped create the "floaty" feel for this page. 


I cut out several of the doodly hearts from the paper and scattered them up the side of the layout. Tiny word stickers are the perfect little accent for adding details to layouts too. 


I added journaling up the side of the page as well as a doodly border and navy Heidi Shine splatters to finish off my page. 


I have also created a process video for this layout which I will link below. Happy scrapping! 
Adele 


Wednesday 12 September 2018

"Happy Birthday Mak!" by Allara Bamforth

Hello Wednesday!

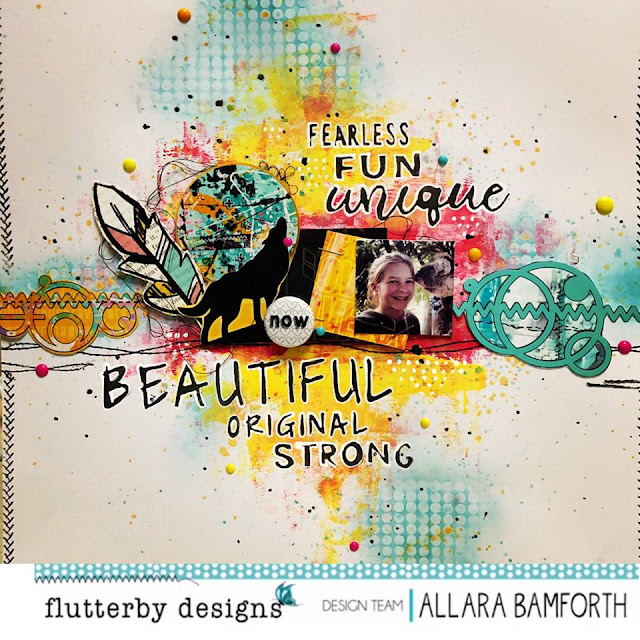
Today I wish my youngest daughter Makenzi, a Happy 17th Birthday! And to celebrate, I've created a layout featuring one of my favourite pics of her.

To start off this layout I've picked some Flutter Colour Paint in the colours Fire Engine, Sunshine Yellow and Raspberry punch and just randomly brayered them over my background in kind of a diamond shape. Once dry I've used the Halftone Stencil with some transparent gel medium at the top, bottom and two sides of the painted area. Once the gel medium is dry I've used the Distress Oxide Ink in Broken China and just lightly inked over the stencilled areas.


Through the middle I've used some of my favourite 'Wild Bohemian' Everyday etc cards and cut out some of the shapes and designs. Added to this I've used some stitch stamps from my stash to add some interest. 

Using the fabulous brand new stencil 'Arty Farty', I picked some words that I think match Mak's spirit and coloured them in with black artliner and then traced them around with white posca.


To finish off I've added some black thread. Randomly added some Neon enamel dots. And popped on an oldie but goodie Flair Button 'Now'.

Really like how this layout came together and I think it's bright, joyous and fun - just like my girl Mak.

Till next post,


Sunday 9 September 2018

Art Is | Rachel Dutko

Hi everyone

Have you seen the brand new Arty Farty stencil? OMG I think its my favourite stencil ever!

Today I am sharing a few projects that I have created with this awesome stencil.


I have recently tried my hand at paint pouring. Let's face it, it looks like so much fun and
really messy - right up my alley!
I thought I would try paint pouring with my Flutter Colour paints!


First, I chose three colours - Tropicana Teal, Orange Goldfish and Sunshine Yellow. 
I mixed each colour of Flutter Colour paint with pouring medium in separate cups.


Then I poured each of the colours onto four 4"x4" canvasses.


I also added some dark navy and white colours just to add some contrast.


Then it was simply a matter of moving each canvas around until they were fully covered with the runny paint.

I left them for a couple of days to completely dry, then I stencilled some words from 
the Arty Farty stencil on with Colour Blast Colour Paste.


Once the Colour Paste was dry I traced through the 'ART' word with a journaling pen
as a shadow word to the focus words.


I had some mixed pouring paint left over so I mixed it all together and 
poured it onto another canvas.

I mixed some Orange Goldfish Flutter Colour paint with some modelling paste to stencil onto 
this canvas, this time using the whole Arty Farty stencil.


 Once the letters were dry I outlined them with a journaling pen for some definition.


I really love how these turned out.
I hope you can take some time to experiment
with some new techniques and use your supplies in new ways.


Thanks for looking
Rachel x x