Tuesday 23 April 2019

RESPECT | Allara Bamforth


Good Morning!,

I hope you all have had a lovely Easter Break! I was lucky enough to have 5 days off and we visited the Coast but back to work today.

As we are coming up to ANZAC day I thought I would see if I could possibly do an ANZAC themed layout using Flutterby Designs goodies and I think may of just pulled it off! Was a little bit of a challenge.

On my background I've rolled across some Flutter Colour paint in Green Limousine, Fire Engine red and Artic White across the miggle and a little bit in the top left and bottom right corner. I was hoping to match the colours to my photos which were of the wonderful poppy display at the Skillion at Terrigal a couple of years back.

Over the top of the painted areas, I've used some Black paint through one of the mini square stencils. I 've also added to stamped images from my own collection. and then splattered some of the paint over the background.

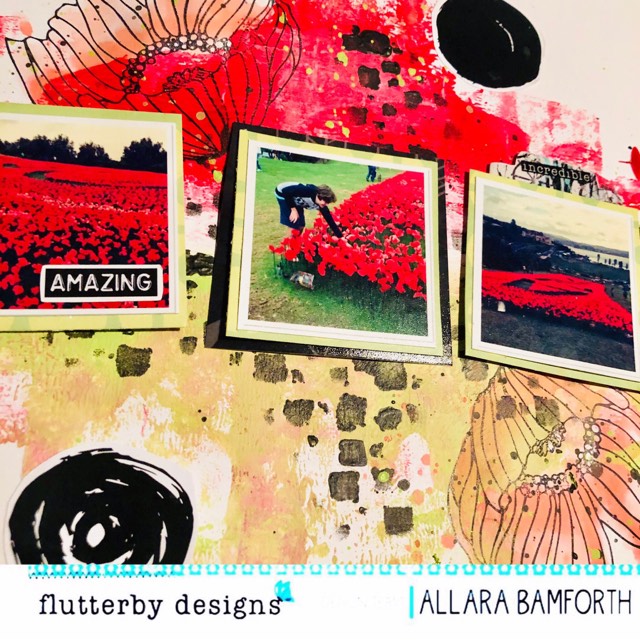
From the 'We Run the World' 12 x 12 Papers I have cut some circles to place over my background. My photos are matted in previous off cuts from Everyday Etc cards from a number of different collections as well as the arrows which I've cut out from these cards as well.

My Respect title uses the Large Magical AF Alphabet sticky quotes which I've added a wash of the Green Limousine so they match in with my colour scheme. The 'Grateful' and 'Amazing' Sticker is also from Sticky Quotes as well as the Flair Button 'We Are'. And a Page Tab added to the third photo.

Thanks for taking a peek.

Till next time,


Sunday 21 April 2019

Be You | Rachel Dutko

Hi everyone!
Rachel back with you today with another layout 
using the Magical AF collection.


My inspiration for this page was to use circles.
I created a mixed media background using Colour Blast Colour Spray 
and some stamped stitched circles.
I then added some heavy body acrylic paint through a Halftone stencil 
for some more grungy circles in the background.


To keep the circular theme going, I dusted off my Big Shot and some different circular metal dies, 
and cut some Everyday Etc filler cards to use as layers. 
I also scattered some small circular 'negative' pieces around my layout.

I used the 'Be You' card from the Everyday Etc cards for my title. 
I then trimmed some quotes from another Everyday Etc card to place around my page.


Because the design using die-cut Everyday Etc filler cards was so busy 
I haven't added too many embellishments. I added a flair and a sticker
as well as a couple of embellishments from Charm's Creations.


Lastly, I added a few enamel dots and black ink splatters.
 
Thanks for looking
Rachel x x


Friday 19 April 2019

Dream Big, Be Magic | Tamara Buckler

Hey Hey FB babes,

I'm up today sharing another super fun layout featuring, you guessed it, the Magical AF collection.

The design for this page was inspired by a layout I spotted over on Instagram ages ago, and I love that it has allowed me to highlight so many of the awesome 12x12 papers.


I began this page by creating some texture on the background by running some texture paste through a couple of Flutterby Stencils. To create the scallops, I traced around a role of washi tape, and then cut them out by hand. I have used the Somewhere over the Rainbow, Secret Garden, Precious Gem, and Waves of Wonder papers to create the scallop banners. 


I added some messy stitching with my sewing machine to adhere the scallop banners to the page, and then added a messy border on each with my trusty sharpie fineliner. I randomly popped some of the circular edges up with foam tape for added dimension.


My photo is matted on a random assortment of Everyday Etc Cards and scraps from the 12x12 papers. I added in some Page Tabs to the left of my photo and tucked in a Die Cut frame under the stack. 


I used more Die Cuts to create my title, starting with the 'Dream Big' around my photo, and the 'Be Magic' to the bottom right. To balance this out, I added another cluster to the top right using more Die Cuts, and a Flair Button from this collection.


To finish off the page, I added some Die Cut hearts around the place, and splattered some black ink for contrast.

I love how this page turned out. Because this collection works so well together, what could have been a very busy and chaotic page, really works with lots of colour and texture.

Thanks for stopping by today!

Big Loves
Tam xo


Monday 15 April 2019

Family || Bernii Miller

Helloooo


Happy Monday.. It's a new week and a new time for some Flutterby Designs inspiration. 

Today I have a layout share for you using bits and pieces from the " We Are" collection. I used the filler cards to layer behind the photos over the "Got Letters" stencil that I used randomly in the background using modelling paste. I love the stencils as they are so sturdy and nothing seeps through even with the thickest of mediums. 


Then to create the title I used the awesome " We Are Family" acrylic piece that was released with this collection. The teal colour is gorgeous. 


I then scattered some flair on both the top and bottom flower clusters!! I do love me some flair and they are the perfect touch to any layout 


I used used the adorable " Page Tabs" wood veneer tabs to tuck beside and under my photos. You can check those out in the store HERE


Thanks so much for stopping by today and I hope you find some time in your week to get creative with your Flutterby Designs goodies. 

Till next time 
Much love 
Bernii xx


Saturday 13 April 2019

2019 Project Life- Chrissi M

Hello Lovelies,
I finally decided to start my 2019 Project Life. Yes, I know, we are in April lol, but its a start.


 I have decided to use some of my Flutterby Designs Stash to do my project life. This spread was made using mostly bits and pieces from the Xtreme Teen Collection- One of my faves.


For my title card, I used the Xtreme Teen Filler Cards, and the Week Variety Wood Veneer Pack
This is my week 4, and there are alot of  photos that suited this theme. There was soccer clinic adventures, car break downs, lots of fun stuff that worked well with this collection.
Throughout the spread, I used alot of the Xtreme Teen Wood Veneer bits. They worked so well for the layout.
I also recently rediscovered my pouch full of  Fluterby Sticker Sheets. OMG how I love these. There are all different ones, I love the sticky Quotes, and the icons that come with each collection. I love the attitude of the Flutterby Designs Collections.
I have also got a process video up on youtube for this Project Life spread, if you wanted to see more of how I put this together, and learn more about the Flutterby Products I've used. Hope you stop by and check it out.


Chrissi M


Thursday 11 April 2019

One Cheeky Kid || Elisa Ablett


Hi everyone, 

Elisa here from the design team with my latest layout for Flutterby Designs.

LETS DIVE TO THE BOTTOM OF YOUR FLUTTERBY STASH!

I wanted to go with 'boy themed' mixed media layout using bits and pieces from the NEW Magical AF collection and adding them to Flutter Paint, Knucklehead Stencil and even some Xtreem Teen pieces I have left over.


Take your Magical AF paper and cut on a crazy angle, add a small amount of white paint or white gesso along the inner cut edge. Add small sprays of black and teal Dylusions Shimmer Spray and dry.

Smooth black ink through your stencil using a distress tool, keeping to the inner edges.


Layer Everyday Etc Filler Cards under your photo cluster and before gluing down your cluster, squeeze teal Flutter Paint in a squiggle along the inner edges.


 Don't forget to raid your stash to expand your new collection !

Thank you for stopping by the blog today.

Hugs

Elisa x


Monday 8 April 2019

Always Be Kind | Allara Bamforth

Good Morning Crafters,

I'm on the blog today with another layout using the 'Magical AF' collection and decided this week to try something monochrome.

On my background I've smudged over some Flutter Colour Paint in Aquamarine Dream. Over this I've used some oxide ink colours through the Halftone Stencil and another stencil I had with bigger circles. I've used some black aqua pastel to draw some free hand circles and used a touch of water to smudge this out.

I've them matted my photo in various shade of blue/aqua from the 'Magical AF' Everyday Etc Filler Cards. Next I've added a co-ordinted Page Tab from 'Magical AF' and some of the gorgeous Die Cuts Bits and Bobs for my title and some of the hearts. My feathers are a stamped image from my collection in the oxide ink I've used for the background.

To finish off I'ved added some stickers from the 'Magical AF' sticky quotes and a couple of Puffy Heart Stickers.

Thanks for taking a peek and enjoy your week!!

Till next post,


Friday 5 April 2019

My Girl Stitches | Rachel Dutko

Hi everyone!

Rachel back with you today with another layout to share.


I created a mixed media background, 
firstly by swiping some 'Sunshine Yellow'  Flutter Colour Paint 
onto some black cardstock with an old gift card. 
Once that was dry I applied some Colour Blast Colour Paste 
though a Sugar Sprinkles stencil. I also added some paint splatters.


I layered some 'Magical AF' Everyday Etc filler cards under my photos.

I cut a phrase from a 'Magical AF' Everyday Etc card for my title, 
then added some journalling.


I added some page tabs, a flair button, a star die-cut
and a cluster of embellishments from 
Charm's Creations and D'Lish Scraps.


Thanks for looking
Rachel x x


Tuesday 2 April 2019

Make Today Shine | Tamara Buckler

Hello Flutterby Friends, 

I'm up on the blog again today to share another fun little number with you featuring the Magical AF collection. This time I focussed on using the 12x12 papers from the paper pack


The main piece is the 'Never Plain' 12x12 patterned paper, which I added some texture paste to through the 'Creative Goddess' Stencil. I then added some watercolour and ink to add some colour to the patterned paper. To create the large photo matt area, I used the 'Secret Garden' and the 'I'll keep you' 12x12 paper.


I matted behind my larger photo using some Everyday Etc Cards, and fussy cut a frame from another to highlight the other photo. I also trimmed out one of the smaller frames in the large photo matt, and tacked in a piece of the cut-a-part sheet to start my title. I used a Die Cut to finish the title off.


There wasn't a heap left to do to finish off this page, as there was already a lot going on. So, I've just added some more Die Cuts, some page tabs, a flair button, and some bits of bling.


Thanks so much for stopping by! Make sure you pop over the shop and spread a little love for the Magical AF collection!