Showing posts with label Mini Stencil. Show all posts
Tuesday, 23 April 2019
RESPECT | Allara Bamforth
Good Morning!,
I hope you all have had a lovely Easter Break! I was lucky enough to have 5 days off and we visited the Coast but back to work today.
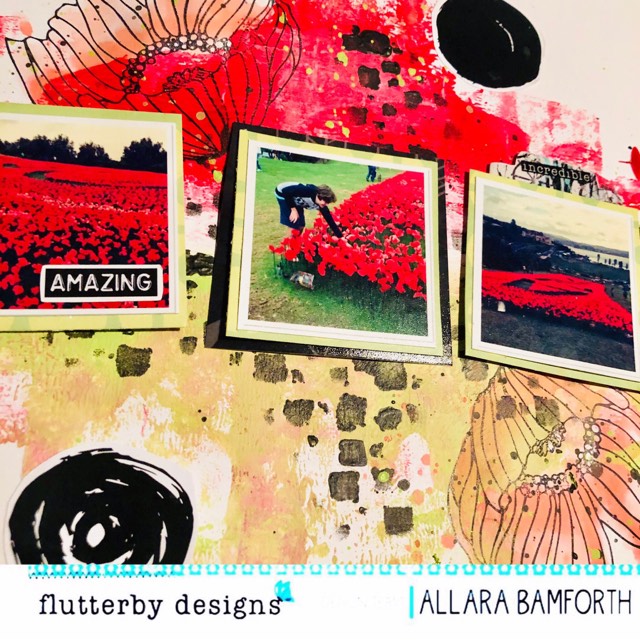
As we are coming up to ANZAC day I thought I would see if I could possibly do an ANZAC themed layout using Flutterby Designs goodies and I think may of just pulled it off! Was a little bit of a challenge.
On my background I've rolled across some Flutter Colour paint in Green Limousine, Fire Engine red and Artic White across the miggle and a little bit in the top left and bottom right corner. I was hoping to match the colours to my photos which were of the wonderful poppy display at the Skillion at Terrigal a couple of years back.
Over the top of the painted areas, I've used some Black paint through one of the mini square stencils. I 've also added to stamped images from my own collection. and then splattered some of the paint over the background.
From the 'We Run the World' 12 x 12 Papers I have cut some circles to place over my background. My photos are matted in previous off cuts from Everyday Etc cards from a number of different collections as well as the arrows which I've cut out from these cards as well.
My Respect title uses the Large Magical AF Alphabet sticky quotes which I've added a wash of the Green Limousine so they match in with my colour scheme. The 'Grateful' and 'Amazing' Sticker is also from Sticky Quotes as well as the Flair Button 'We Are'. And a Page Tab added to the third photo.
Thanks for taking a peek.
Till next time,
Wednesday, 20 February 2019
Magical AF | Allara Bamforth
Happy Hump Day!
Today I have a layout using the new collection 'Magical AF'. What a fun collection this is and I found the perfect snapchat selfie to use with this layout.
I started off with the fabulous 12 x 12 paper 'The Sky's the Limit' and because I was using mostly blue and pink elements on this page, I smooshed a little Picked Raspberry Oxide ink on my mat and splattered this beneath where my photo would go. Next I used Flutter Colur Paint in Artic White to splatter over the pink as well. I then added some gel medium through the Star Mini Stencil beneath my photo and while it was still wet, I sprinkled over some Bridal Tinsel embossing powder and heat set with my heat gun. This gave a great sparkly effect that added some interest to the back ground.
My photo is matted with various background designs from the Every Day Etc Filler Cards Magical AF collection and I've also added some cut outs from the Everyday Etc cards. From the Filler Cards I've die cut some wings to suit the page and added a Page Tab to the top.
To finish the page off I've used some the gorgeous new embellishments including a Flair Button from the Magical AF Set 2, the gorgeous unicorn paper clip from the Full Collection Kit, the sparkly Puffy Heart Stickers and jewels and the epic Magical Mettalic Arylic Title.
Thanks for taking a peek! I've linked all the new products back to the shop - make sure you grab some before they sell out.
Till next post,
Today I have a layout using the new collection 'Magical AF'. What a fun collection this is and I found the perfect snapchat selfie to use with this layout.
I started off with the fabulous 12 x 12 paper 'The Sky's the Limit' and because I was using mostly blue and pink elements on this page, I smooshed a little Picked Raspberry Oxide ink on my mat and splattered this beneath where my photo would go. Next I used Flutter Colur Paint in Artic White to splatter over the pink as well. I then added some gel medium through the Star Mini Stencil beneath my photo and while it was still wet, I sprinkled over some Bridal Tinsel embossing powder and heat set with my heat gun. This gave a great sparkly effect that added some interest to the back ground.
My photo is matted with various background designs from the Every Day Etc Filler Cards Magical AF collection and I've also added some cut outs from the Everyday Etc cards. From the Filler Cards I've die cut some wings to suit the page and added a Page Tab to the top.
To finish the page off I've used some the gorgeous new embellishments including a Flair Button from the Magical AF Set 2, the gorgeous unicorn paper clip from the Full Collection Kit, the sparkly Puffy Heart Stickers and jewels and the epic Magical Mettalic Arylic Title.
Thanks for taking a peek! I've linked all the new products back to the shop - make sure you grab some before they sell out.
Till next post,
Tuesday, 9 May 2017
I'm Not O-bleeping-kay & Epic Swagger | Belinda Spencer
Hello Flutterby peeps!!
Belinda here today to share two layouts featuring the brand new freaking awesome Xtreme Teen collection.
I love this brilliant collection so much that as soon as I had it in my inky, painty hands I whipped up 5 layouts! It's that good.
Now while I am not currently blessed with teenagers in my house, in no more than a blink of the eyes I will be. With a son that will be turning 11 this year and a daughter turning 12, the attitude levels are on the increase! LOL
'I'm Not O-fucking-kay' Layout
So I recently got one of THOSE phone calls from the school. One young son in excrutiating pain after falling off the swing at school. He had the whole banana arm thing happening so off to hospital we went in an ambulance. He was such a trooper. Not crying or making a fuss. Totally calm throughout the whole ordeal and the very long wait at the hospital. So proud of him. :-)
Here's a peek at my background before I started layering on all of the fabulous embellishments and photo cards in the range. I turned the 'On The Plus Side' Stencil on it's side to create crosses (because I wanted to put a big fat cross through the whole day!). I swiped some Golden Light Molding Paste over the stencil and allowed to dry. Then I diluted some awesome Flutter Colour Paint with water, spritzed my background liberally with water and applied the paints with a soft paintbrush. I spritzed with water a bit more to get that paint really flowing and then dried off with a heat gun. It created a really lovely watercolour effect but still maintained the big, bold, brightness of the paints.
I love how absolutely perfect the embellishments and quotes are for the not so happy experiences!
Here's what I used:
XTREME TEEN:
- Everyday Etc Photo Cards
- Everyday Etc Filler Photo Cards
- Page Tabs
- Wood Veneer
- Sticky Quick Quotes
- Die Cut Bits & Bobs
- Flair Buttons
- 'On The Plus Side' Stencil
- Sticky Quick Quotes
- Bright Tabs 2 Photo Cut Outs
FLUTTER COLOUR:
- Green Limousine
- Orange Goldfish
- Tropicana Teal
Next up is a layout featuring my daughter clowning around for a photo and giving me some teenage swagger!
'Epic Swagger' Layout
I started this layout by swiping some Flutter Colour Paint in Tropicana Teal over my background white cardstock. I also added some drippy Arctic White paint. Once dry, I stencilled on some stars using the Stargazed Mini Stencil and some Golden Light Molding Paste.
I have added a little stamping and then layered on co-ordinating filler photo cards, my photo and embellishments.
Here's what I used:
XTREME TEEN:
- Everyday Etc Photo Cards
- Everyday Etc Filler Photo Cards
- Page Tabs
- Wood Veneer
- Sticky Quick Quotes
- Flair Button
- Wood Veneer Page tab
- Stargazed Mini Stencil
FLUTTER COLOUR Arctic White
I hope you like my projects today and you are feeling inspired to get creative with your Flutterby stash too. You can find all the product I have used over HERE on the website.
Thanks for stopping by.
Cheers
Belinda
Labels:
Belinda Spencer,
boy,
Design Team,
Die Cut Bits & Bobs,
Everyday Etc cards,
filler cards,
flair buttons,
Flutter Colour Paint,
Mini Stencil,
Page tabs,
Photo Cards,
Sticky Quotes,
Xtreme Teen
Wednesday, 29 March 2017
P.S. I Love You | Sue Plumb
Hi everyone! It's Sue here today to share another of my Flutterby creations with you. Today I have a 12x12 layout I created recently using the 'Mad About You' collection. It features a selfie I took of one of my boys laying some love on me, and is a bit tongue in cheek about how I often feel about my kids.
The colour palette for this page was largely decided by the quote on the Everyday Etc card that I wanted to include. I chose to compliment the pink with simple neutral tones and converted my photo to black and white to suit.
I started by brushing some soft pink paint across my cardstock background (I used a Colour Blast Colour Spray in Bubblegum, which I simply tipped into a cup and diluted with water until I achieved the desired shade). Once the paint was dry, I used the cross stencil from the mini stencil set and a lead pencil to add some subtle "kisses" to my background.
My next step was to add a mat for my photo to sit on, so I used one of the 'Mad About You' Everyday Etc filler cards. I also tucked a frame from the coordinating Die Cut Bits & Bobs pack underneath my photo and popped one of the Tiny Sticky Quotes onto it. On top of my photo I added some messy cotton thread and one of the flair buttons from the 'Mad About You' set #1.
I love using a mix of elements to create long sentences on my layouts, and this one was no exception. I used a combination of both tiny and regular Sticky Quotes; a die cut word; wood veneer 'Ampersand' (which I painted black); and some Everyday Etc cards.
To tie the page together, I added some wood veneer mini hearts (also painted black) and some die cut hearts (repeating an element is a simple way of bringing uniformity to a page). I also added some black mist splatters and stamped the P.S. I love you quote around my page to reinforce my title.
Thanks for stopping by today so I could share this with you, I hope I have inspired you to try something similar yourself. Don't forget if you are inspired by something the design team creates, that we LOVE to see it! Pop over and join in our Flutterby Inspiration HQ group on Facebook and show us what you've been doing.
Til next time, happy scrapping! X
The colour palette for this page was largely decided by the quote on the Everyday Etc card that I wanted to include. I chose to compliment the pink with simple neutral tones and converted my photo to black and white to suit.
I started by brushing some soft pink paint across my cardstock background (I used a Colour Blast Colour Spray in Bubblegum, which I simply tipped into a cup and diluted with water until I achieved the desired shade). Once the paint was dry, I used the cross stencil from the mini stencil set and a lead pencil to add some subtle "kisses" to my background.
My next step was to add a mat for my photo to sit on, so I used one of the 'Mad About You' Everyday Etc filler cards. I also tucked a frame from the coordinating Die Cut Bits & Bobs pack underneath my photo and popped one of the Tiny Sticky Quotes onto it. On top of my photo I added some messy cotton thread and one of the flair buttons from the 'Mad About You' set #1.
I love using a mix of elements to create long sentences on my layouts, and this one was no exception. I used a combination of both tiny and regular Sticky Quotes; a die cut word; wood veneer 'Ampersand' (which I painted black); and some Everyday Etc cards.
To tie the page together, I added some wood veneer mini hearts (also painted black) and some die cut hearts (repeating an element is a simple way of bringing uniformity to a page). I also added some black mist splatters and stamped the P.S. I love you quote around my page to reinforce my title.
Thanks for stopping by today so I could share this with you, I hope I have inspired you to try something similar yourself. Don't forget if you are inspired by something the design team creates, that we LOVE to see it! Pop over and join in our Flutterby Inspiration HQ group on Facebook and show us what you've been doing.
Til next time, happy scrapping! X
Labels:
12x12,
Design Team,
Die Cut Bits & Bobs,
Everyday Etc cards,
filler cards,
flair buttons,
Mad About You,
Mini Stencil,
mixed media,
scrapbook layout,
Sticky Quotes,
Sue Plumb,
wood veneer
Saturday, 25 March 2017
{create} Like a Boss with Belinda Spencer
Hello Flutterby peeps!!
Belinda here today to share another layout created with the 'Creative Chaos' kit.
{create}
I started with a base of kraft cardstock which is my favourite!
I mixed up my own pretty pink colour using Raspberry Punch and Arctic White Flutter Colour paints. I used a foam brush to swipe that colour across my background concentrating on where I was going to layer on the photo and filler cards as well as my photo.
Next I added some stencilling using the 'Bubble O' Fun' Mini Stencil. I used a make up wedge to add the gesso lightly over the stencil. I also used a wet paintbrush to flick some of the pink paint over the background. The white splatters were added using a white Posca paint pen.
I layered on a combination of soft pink and kraft coloured filler photo cards to co-ordinate with the soft colours of my photo.
Finally I added my title and embellishments.
Here's what I used:
- Everyday Etc Photo Cards
- Everyday Etc Filler Photo Cards
- Sticky Quick Quotes
Wood veneer:
- Arctic White
- Raspberry Punch
Snap 2 Fussy Cuts
Short, sharp and shiny from me today! I do hope you feel inspired to create something yourself with your Flutterby stash. Make sure you share your lovely creations in the Facebook Inspiration HQ group.
Cheers
Belinda
Thursday, 9 March 2017
Creative Chaos Two Ways with Belinda
Hello Flutterby peeps!!
Belinda here today to share my first post for the month featuring the fun and funky 'Creative Chaos' collection
A little birdie told me that there are only a few of these kits left so cyber RUN over HERE to get yours quick!!
You will see how very versatile this awesome kit is with the two layouts I have created in the chaos that is my desk. My first layout is a very soft and pretty layout showcasing the sweet and lovely side of the range. My second layout is the polar opposite and crosses over to the dark side. SPOILER ALERT!! It also features many 'sentence enhancers'.
Firstly, the sweet one.
'Beautiful' Layout
Such pretty, soft pastel colours! I began by adding some texture to my background with texture paste and the I {Heart} You Mini Stencil. I then mixed up my colour with Flutter Colour paints to match the hoodie my daughter is wearing in the photo. I diluted the paint HEAPS to create a watercolour effect on my background and flicked some of the colour over the surface too. I also coloured a white doily with the same colour and added on top.
Next I shuffled around some photo cards and filler photo cards until I had a nice mix and layered them together. A quick staple holds them all in place for me until I am ready to stick down on my layout. Then I added my photo, a frame from the 'Honey' Fussy Cuts, my title and a scattering of cute embellishments.
Here's what I used:
- Everyday Etc Photo Cards
- Everyday Etc Filler Photo Cards
- Page Tabs
- Arctic White
- Orange Goldfish
- Raspberry Punch
Next up is the 'dark' one featuring a photo of me!
'Me' Layout
Told you it was dark! LOL I just LOVE that new 'You've Got This' Stencil. I swiped some texture paste over it and then when it was dry sprayed on a whole lot of water and mist to co-ordinate with my photo and the filler cards I had already chosen to use.
I outlined some of the stencilled words using a fine black Posca Pen to make them stand out a bit more and then layered on a whole lot of stuff!
Here's what I used:
- Everyday Etc Photo Cards
- Everyday Etc Filler Photo Cards
- 'Purple Polaroid' Photo Cut Out
- Page Tabs
Thankyou so much for stopping by the blog today. I hope my projects have gotten you inspired to create some chaos in your own space!
Cheers
Belinda
Sunday, 26 February 2017
'You Rock'.... By Skai Mitchell
My daughter Trinity-Jewel is a force to reckoned with.... She was just one of those kids born ready to take over the world, and heaven help any one that gets in her way.
Here is my tribute page to all the girls that 'rock'... may we know them, may we raise them, may we love them.
I've pulled out some of my older Flutterby Design collections and given it a grungy twist.
I've started off with some Colour Blast Colour Paste through the Star 'Mini Stencil' and scraped some extra randomly over the page. I added in some shimmer dusts and black paint splatters.
I've used pieces from the 'Blank Palette' Everyday Etc Cards and 'Mad About You' - Filler cards to create by backing pieces, and have fussy cut the star from one of the pieces.
Add in some 'Blackboard' Sticky Quotes and 'Creative Chaos' - Page tabs, and the 'You Rock' Wood Veneer and you have one rockin' page.
So dig out all your old stash and get creating!
Dont forget to share it over at the Flutterby Inspiration HQ Facebook Page
Thursday, 9 February 2017
Purr-fect Stalker
Hello!!
Belinda here today to share two layouts I have created with the brand new, totally fabulous FUR-EVER FRIENDS collection.
The colours in this collection are so vibrant and bright and a perfect match for the brilliant new Flutter Colour paints! I have had my very first play with these paints and I am super impressed with the results.
Here's my first layout.
'Purr-fect Love' Layout
I started by applying some molding paste through the I {heart} You Mini Stencil. I repeated this until I had enough stencil work to be visible around my central photo area.
Next I chose paints to co-ordinate with the photo cards I was going to use and diluted each one with some water. I spritzed my layout with water around the stenciled area and then flicked the colour over this area using a soft, wet paintbrush.
Next, I cropped my photo cards and played around with the arrangement until I was happy. A quick staple or two held everything together so I could add it quickly to my background without anything shifting. I love using staples this way because I know (from experience) that if I take it apart to add tape to the back I will never get it back the same way. LOL
Next I layered on some messy strands of embroidery thread, my photo and all embellishments.
I created my title by fussy cutting the 'purr-fect' from a photo card. I also cut apart the wood veneer 'Hello Love' so that I could use the 'Love'. I haven't wasted the 'Hello' part though! Scroll down to see how I used that. :-)
Here's what I used:
FUR-EVER FRIENDS:
- Arctic White
- Grape Soda
- Green limousine
- Tropicana Teal
And now for something a little more on the dark side.
'Hello Stalker' Layout
I love this photo of my Burmese cat, Noodle, giving me stink eye through the hole in her activity centre. She is the sweetest natured cat but always manages to look feral in photos.
Check out how beautifully bright the Flutter Colour paints are on the dark background!! And that is after I watered them down for a more watercolour effect. Pretty cool huh?
I created a wash of colour over my background and then splattered a lot of colour over it too using a soft wet paintbrush.
Then I added a little detail with the gorgeous NEW Shake Your Tail Feather Stencil and some molding paste.
Next I layered on my cropped photo cards, photo, embellishments and title. And there is the 'Hello' from the 'Hello Love' Wood Veneer that I cut in half. I couldn't resist using the cheeky quote cut from the photo cards too.
Here's what I used:
FUR-EVER FRIENDS:
- Orange Goldfish
- Raspberry Punch
- Sunshine Yellow
I hope you love this collection as much as I do and feel inspired to scrap your own furry friends. I have lots more to come so keep an eye out for my next post later this month.
Cheers
Belinda
Labels:
Belinda Spencer,
Design Team,
Die Cut Bits & Bobs,
enamel dots,
Everyday Etc cards,
Flutter Colour Paint,
Fur-ever Friends,
heart stencil,
Mini Stencil,
Page tabs,
Photo Cards,
scrapbook layout,
Sticky Quotes
Subscribe to:
Posts (Atom)